Showing posts with label Stamped Card. Show all posts

Monday, March 15, 2021

GIVEAWAY: New Stamp Releases - Beautiful Courage & Fierce and Brave

 It's time for some happy dancing, and a stamp giveaway! My brand new set, Beautiful Courage, is being released over at STAMPlorations today! And a STUNNING set designed by Shery Russ called Fierce and Brave is also being released. Both of these sets were designed with Women's History Month in mind. 

I l-o-v-e the chic outlines and fierce phrases from the Fierce and Brave set: 

Red and clear houndstooth background with a woman's silhouette in the foreground handmade card featuring Fierce & Brave stamp set by STAMPloraitons

I thought they could be used for all sorts of occasions - add a little ribbon and viola! a wedding card! 

Handmade stamped Card with gold lacy background, pink flowers and a bride in the foreground made with STAMPlorations Fierce and Brave stamp set

There is nothing like sending an encouraging cards to your lady friends and between these two sets, encouragement and uplifting sentiments are covered in droves! 

Here's the cards I designed for the Beautiful Courage set: 

Handmade stamped one-layer card featuring green leaves and an African American woman's profile using STAMPlorations Beautiful Courage stamp set

Whether you're into one-layer cards or lots o' layers cardmaking, the beautiful profile image and warm sentiments are perfect! 

Handmade card with layers of yellow, black, and red patterned paper with an African American woman's profile and encouraging text.

Which card is your fave? 

Want to win? Head on over to the STAMPlorations blog and leave a comment and you could take both sets home for free!


If you want to skip the contest and head right to the ordering, use code STAMPGIRLBECCA for 20% off your order. :) 


Friday, January 29, 2021

Collage Valentine's Day Card

Today I'm up on the STAMPlorations blog with a whole feature tutorial on how to create this collagey Valentine wonder! 


I talk all about creating a colorful decoupaged background.


Creating a grungy background using the Artsy Border Maker stamp set. 

And the perfect non-mushy sentiment and focal image using the Funny Kinda Love stamp set.


Go check out my tutorial on the STAMPlorations blog and also feel free to use my code STAMPGIRLBECCA for 20% off anything in the STAMPlorations store. :) 

I also would be remiss if I didn't mention where I got all my lovely collage papers. My friend Lauren Bergold of all the GOOD blog names were taken gave me these awesome papers as a gift and I, of course, am in love with them. She finds the perfect old books, dictionaries, and encyclopedias and creates amazing packages of collage paper in her Etsy store.

Saturday, December 5, 2020

Creative Artiste Mixed Media Challenge Guest Design

There's nothing better than the feeling of scrubbing off inky, messy hands after a good play session in the studio. 

Mixed media handmade card with prima flowers that says everything begins and ends with you

I have the honor of being a guest designer this week over at Creative Artiste Mixed Media Challenge. I happen to love this challenge because it's always anything goes as long as it's a mixed media project. 

One of my friends asked for a special commissioned card for his wife on their anniversary. 


I started with a piece of white background and stamped it with a text background stamp and Walnut Stain Distress Oxide. I spritzed with water and then added two drops of Cosmic Shimmer Watercolour Ink. 

Next, I added another layer of stamping with Visible Images Fibrionaci stamp, embossed in Speckled Egg Distress Glaze. 


I decided on the different elements I wanted to bring into my card - a peach frame that I covered with blue and gold InkaGold to antique it, and a white butterfly that I sprayed with Distress Spray Stain and then added Speckled Egg Distress Glaze before heat setting it (and almost starting it on fire. :o ) 

blue and coral mixed media handmade card with frame, butterfly, and Priima flowers

I started layering my card with Prima flowers, my frame and the butterfly, and then added little bits of ivory frantage around the edges before dusting it with some Speckled Egg Distress Oxide Spray Stain. 

I added some romantic, gushy words to make it appropriately lovey-dovey for an anniversary and - I've got to say it turned out sooooo pretty. 

Thanks for popping by, and I hope you'll go get all inky and play along at Creative Artiste. 

Tuesday, November 10, 2020

Coffee Lover's Blog Hop: Fall/Winter 2020

 It's been a fair bit since I've hopped along in the Coffee Lover's Blog Hop, so I brushed off the old coffee stamps and got to work. 


Since I'm a lover of all things pun related, I pulled out the Caffeinated Christmas Big Grins by Becca Cruger STAMPlorations set (pssst: this set is on sale for $12 this week AND you can get an additional 20% off by using code STAMPGIRLBECCA)


I don't know about you, but when I make holiday cards, I love using the traditional red and green.


I paper pieced the cute little tea cup from the All You Need is Coffee set using some holiday patterns and added a sweet little holly to jazz it up. Because let's be honest, glitter is always called for. 

I liked this card so much, I made a second one in the same vein. 

Those sentiments just crack me up and these are the perfect quick and simple Christmas cards. 


I'm also linking up to:
Creative Craft Cottages - Christmas/Winter
Dragonfly Dreams - Christmas/Winter


Tuesday, October 20, 2020

STAMPlorations 7th Birthday Bash - Day 2

It's day 2 of STAMPlorations Belated Birthday Bash and I'm popping in for a quick share! 

Red, black and white handmade holiday card using holly stencils and white gel pen

I'm always looking for quick and simple Christmas cards because it seems like you have to make a kajillion. This one is extra good, too because it's flat! (or mostly flat if you ignore the sequins, which your mailman will). 

I used the brand new Holly ARTplorations stencil by Sanna Lippert Designs and outlined everything using a white gel pen on black paper. Then I painted in the berries using red Perfect Pearls and added some little red embellies to some of them. I added a strip of washi tape for the sentiment and viola!


Make sure you go join in the fun this week up at the STAMPlorations blog! There are over $150 in prizes being given away!!! Also, if you buy anything from the stamp store, be sure to use code STAMPGIRLBECCA for 20% off your order! 

Saturday, October 10, 2020

Beary Belated Birthday Card

 I am a terrible procrastinator when it comes to mailing out anything... which I know is very weird for a cardmaker. Is it just me? Or do you all have lots of fun making cards and then never can seem to pop them in the mail in a timely manner? 


Cute bear image colored with alcohol markers for a card

This card was designed for my uber talented cardmaking friend, Kevin Bray. Seriously, go check out his blog, you'll be amazed by his creativity. He also has a rockin' Insta account. For the most part, I'd say Kevin and I have pretty opposite styles of cardmaking - he's an amazing colorist with a knack for getting cute, clean cards absolutely perfect. I'm a mixed media card artist who colors up a white spot with a single brush of a finger.

Anyhow, I wanted to send him a card for his birthday... which was in July I think... (I know, I already disclosed how terrible I am as a human being).

But I didn't want to design any ordinary card, I wanted to design an uber cute card and try to be as clean as I'm capable of. 

Artist holding yellow Faber Castell Gelatos

I pulled out all my sunny Faber Castell gelato colors and cut out a bunch of hexagons, because I was using this adorable little bear and bee stamp set, so I thought it fit the brief.

Die Cut hexagons colored with yellow faber castell gelatos for a card making

I die cut the hexes and smudged them with different color gelatos then layered them all together in the background of the card.


I created an even bigger hex for my focal panel and colored this adooooooorable bear from the Studio Katia Kobi the Birthday Bear stamp set. Then I stamped little bees all around and glittered up the wings (photos suck for glitter). 

In the end, it's probably not clean, but it IS super cute so *brushes shoulders*. I hope it made someone very happy three months after their birthday. 

I am so rude. 


I'm going to link this up to Cute Card Thursday's Dies and Punches challenge and NBUS challenge because this whole stamp set has never been used.

Thanks for stopping by!

Friday, September 25, 2020

Stenciled Backgrounds & Paper Pieced Flowers

Today, I'm up on the STAMPlorations Blog with a little tutorial on how to make this card.  


The tutorial has some super fun ways to use up leftovers by creating your own artsy patterned paper with stencils and Distress Oxide inks. 


Vibrant & fun! I would be remiss if I didn't mention where the inspiration from my card came from. The moment I laid eyes on the inspiration image for The Card Concept, I just knew I needed to dream up something. 


Thanks for popping by and go take a peek over at STAMPlorations! 

Sunday, September 20, 2020

Making a Mess

Over at Shopping Our Stash they have a challenge going entitled “Make a Mess”. Basically I feel like that’s every single card I ever make. All I have to do is look sideways at a white space on a card and boom! an only smudge appears. It’s like being King Midas, but sadly nothing turns to gold- only to smudge. 

Mixed media bird card using Tim Holtz stamps

But this card upped the mess ante even for me! In my last blog post I shared a card using the dregs of a cleanup from a pretty horrendous spill of a brand spanking new bottle of Crackling Campfire Distress Oxide Spray Stain. I was going a splatter effect on a card so unscrewed the cap. Enter elbow and a giant spill. *facepalm*

Backgrounds made from a spill of Crackling Campfire Distress Oxide

What is a girl to do besides frantically mop up the mess? However, even if my card doesn’t win the competition, I’ve already won by creating some gorgeous backgrounds and a well-earned red stain on my craft table. 

But I didn’t want to rest on my accidental mess laurels for this challenge. Au contraire! I decided to pull out my messiest products and up the ante. 

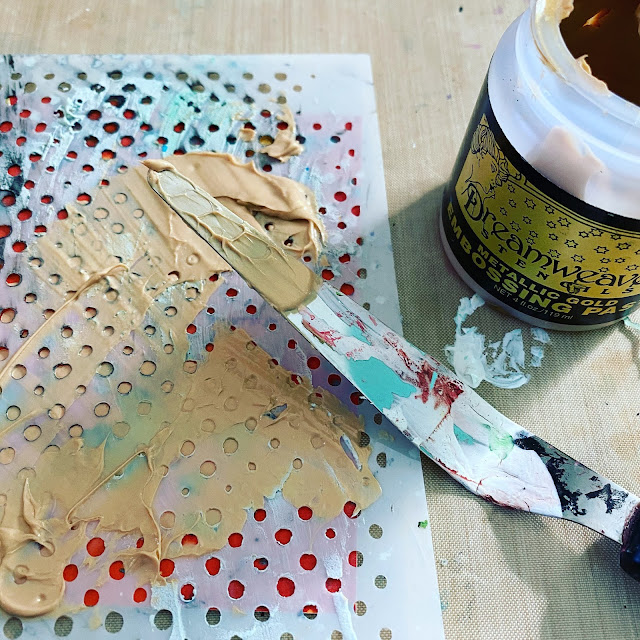
Gold Metallic Embossing paste through a dot stencil for card making background

For my  next act, I pulled out some Dreamweaver metallic gold embossing paste and slopped that through the STAMPlorations Dots All Over stencil. 

Mixed media card background, red blue and gold using Distress Oxide spray stain and embossing paste

The texture! In case you’re wondering about the added colors, they are Mermaid Lagoon Distress Oxide and a gold shimmer by Heidi Swapp. 

Using brown gelatos along the edge of a background

Next up on the messy agenda, I scribbled some brown gelatos along the edges of the pieces I was going to use and smudged them to soften the lines with my fingers. 

Also, you can see I stamped an image over the background and used Distress Glaze. 


So let me talk about my focal bird. I’m ashamed to say I’ve probably had this Tim Holtz stamp set for close to 10 years and never used it. >insert head hanging here<  I knew I had to get messy with the bird, too, so he wouldn’t take a backseat to my background. We had a little messy experimental play together. 

Blue Distress Oxide and Tim Holtz Spray Stain for card making

I sprayed some Oxides and stains and dried them on a paper. Then I stamped a blue layer and brown layer of Distress Inks, and while the ink was still wet from stamping, I applied Distress Glaze over it. It gave it an antique glassy feel. 

Mixed Media Card using Tim Holtz stamps and Distress products

I adore the way this card turned out and I think I’ve sufficiently risen to the Make a Mess challenge. To finish off my card, I mounted it to some Hambly patterned acetate. 

I’m also going link this up to the NBUS challenge, as I finally gave this 10-year-old bird some wings AND tried out Distress Glaze for the first time. 

This one is also going over to Creative Artiste’s Anything Mixed Media goes. 

Friday, September 18, 2020

Handmade Card for the Most Beautiful Person in the World

 Do you ever have that one friend who is basically the best? Who shows up for you? Who lends you all of her vast array of tools because you don't have a handy bone in your body? Who won't cry with you because she's too busy grabbing the tissues and a bottle of wine? 

Now. Do you have have a friend like that who ALSO has an amazing husband who commissions a birthday card for said friend? 

Die Cut Lace Edge Focal Image for Handmade Card using Tim Holtz Distress Inks

It's at that point you KNOW you have to pull out all the stops. I'll apologize in advance because I got completely swept up in the crafty process and did not stop to take photos along the way, but I'll explain what I've done. 

BACKGROUND: 
Created with the new Tim Holtz Cracked Campfire Distress Oxides. Process? Spill it all over your desk and then frantically mop it up (more about that in a blog post to come) This was the dregs of the dregs of the dregs of the cleanup process. Next, I stamped the flowers from STAMPlorations Dee's Artsy Impressions Wooded stamp set in the corners using the Tea Dye Distress Ink. I painted the flowers in with gesso to give them an antiqued feel and then painted around the edges of the flowers with Tea Dye for a shadowed effect.
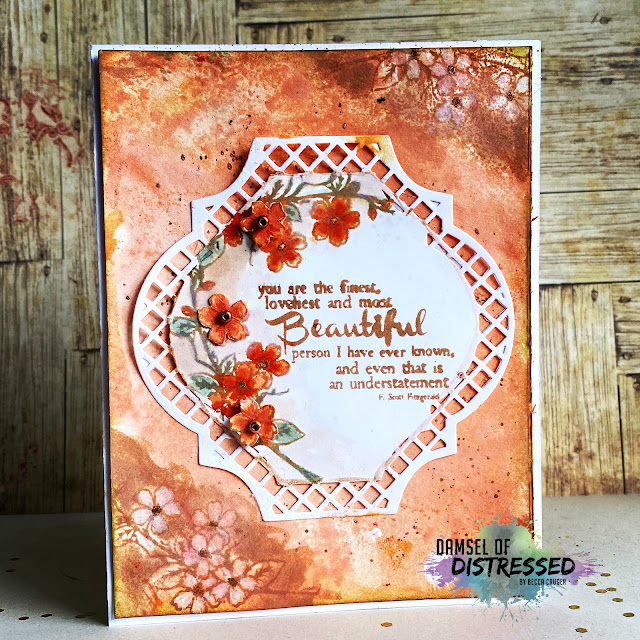

Die Cut Handmade Card for a Beautiful Person using Tim Holtz Distress Oxides and Distress Inks

FOCAL PANEL: 
Die cut the panel using the Spellbinders Labels 41 die set. Then I stamped the flowers using Tea Dye Distress Ink and watercolored them by smooshing some Cracked Campfire (blossoms) and Peeled Paint (Leaves) onto a pad then picking it up with a wet brush. The centers of the flowers have Antique Bronze Perfect Pearls, as well as seed beeds. I cut some of them out for dimension. The sentiment is from the STAMPlorations Big Grins by Becca Cruger Strong Women stamp set. 

P.S. - STAMPlorations clear stamps are all 25% off right now so... beeline for the store if you want to snag either of these sets. 

I love this sentiment. A) because I love books (even though I think Fitzgerald is the worst - fight me.) and B) because it's just the epitome of everything I wanted my friend to know, and I'm sure that her amazing husband feels about her. She truly is beautiful, so I'm chuffed with how this card came out. 

I'm linking this up to the following challenges:

Little Red Wagon: Nature, flora or fauna

Crafty Gals Corner: Fall Colors

Aud Sentiments: Anything Goes + a Sentiment


Tuesday, September 15, 2020

Cupcakes and Sprinkles!

What is the haze like in your neck of the woods? I am smack dab in the middle of the country, but our sun is a bright orange, veiled by a gray smoke. If it's this bad here, I can't imagine what it's like where the wildfires are raging. My heart goes out to those of you who are impacted and on the west coast. 

Whilst living in the cover of darkness, I thought it would be the perfect time to spend a moment in my craft room. I'm popping in quickly to share my make. 
Cupcake Die Cut Stamped Card

My stash of birthday cards is running quite low and so I thought I'd stock up my stash this weekend. Seize the Birthday is running a die cut challenge, so I looked at my magnetic wall and found a fun die I haven't used in a bit. 


I don't craft with die cuts very often as a main focal point, but what better way to stretch your crafty muscles than to try something out of your comfort zone? I found some lovely patterned papers and used the Cupcake Builder #1 set from STAMPlorations to get to work building layers. 

Die Cut Cupcake Stamped Card with Bead Sprinkles

I find mixing and matching patterns both relaxing and challenging, but I loved the way all these patterns wound up. To finish off my card, I added some beads for "sprinkles". 

Thanks for stopping by! 

Thursday, September 10, 2020

Inky Blue Blue Blueeee Butterflies

 A craft session isn't a craft session unless you leave with ink all over your hands and it looks like you have bruised your arm because stain has dyed your skin permanently blue, right? 

...just me? 

Vintage Hero Arts Butterfly Stamped and colored with Color Burst Powders

I love working with Color Burst powders, but unless you have a very gentle touch things can get messy quite fast. Warning from me to you: Do not squeeze the bottle EVER. Just a light side tap will do. 

Blueprint Sketch Tim Holtz Distress Oxide Through Stencil

I wanted to see how Distress Oxides would react with Color Burst powders, so I began by sponging some through a very well-loved, painted up stencil (STAMPlorations Dots All Over Stencil). 


Brutus Monroe Color Burst Powders through STAMPlorations stained glass stencil

Next, I firmly laid down another stencil (STAMPlorations Broken Glass) and painted it lightly with water, then added some powder to the water, then spritzed lightly with water again and spread with my paintbrush. 

I actually love the way the Distress Oxides come through. It's not quite the reaction I thought would happen (I expected slightly gray and chalky) but it's beautiful nonetheless. 

Vintage Hero Arts Butterfly painted with Ken Oliver Color Burst Powders

Sometimes my vintage stamps don't get enough love, as is the case with this beautiful butterfly, which is definitely one of my favorite stamps. I inherited it from my grandma's stamp collection when she passed away about 5 years ago. I ?think? it's vintage Hero Arts, but if anyone recognizes it, please let me know. 

Anyhow I stamped and colored a bunch of these, so you can see what some of the other Color Burst powders look like. 

Stamped Handmade Card with Blue Butterfly colored with Brutus Monroe Color Burst Powders

After I fussy cut the butterflies (seriously I need one of those auto cutout machines) I layered with some black and white paper, as well as some vintage lace, also courtesy of my grandma's stash. I finished it off with a Tim Holtz sticker sentiment. 

I'm playing along in these challenges: 
Get Creative Challenges: Black and One other Color
Crafty Cardmakers: Things with Wings
Simon Says Stamp: Use your Favorite Stamp

Et voila! Thanks for stopping by! Leave me a comment and I'll make sure to return the favor. 


Friday, August 28, 2020

Mixed Media: Two Ways Tutorial

Hello Friends! 
It's been awhile since I've written, but I've decided to hop back into the bloggy world with both feet and have lots of great makes I'm excited to share with you. 

I've created two awesome cards using the STAMPlorations Wild and Free stamp set, with full mixed media tutorials over on the STAMPlorations blog. 

The first card showcases what happens with loads of inky goodness and layers in a full blown mixed media montage. 

Mixed media card using layers. Stamped tree and moon.

The second card features the pristine, crisp lines of a clean mixed media card. 

Clean and simple mixed media card with moon and distress inks

Go check them out! Thanks for popping by!