Wednesday, May 25, 2016

A Beau-Tea-Full Mixed Media Card - Card Concept Guestie

There's nothing better than when you look at an inspiration image for a challenge and instantly know exactly what to do .


That's what happened to me when my peepers beheld this stunner for the latest Card Concept challenge:


I'm guest designing with the Card Concept team for the month of May and it has been SO much fun!! When you are surrounded by talented people - like the design team of Card Concept - you can't help but to be inspired and put your best foot forward! 

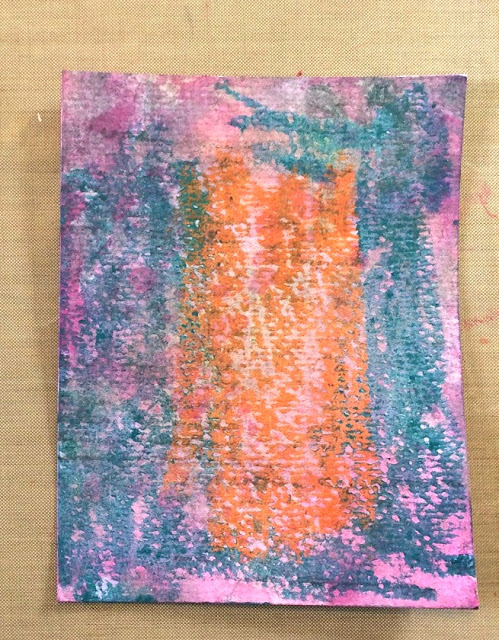
For this card, I started by gessoing a piece of heavy weight cardstock and then I scribbled on some Distress Crayons:


OOoooo messy! 
As soon as I saw the scribbles, I knew I'd created a masterpiece and so I put my supplies away. 

Just kidding! haha

In reality, I used my finger to smear the Distress Crayon and create a smoother look. 


You heard me mention earlier that I gessoed the page before I applied the Distress Crayon. 

Why? 

I'm glad you asked!


Check out the difference between these two backgrounds. The one on the left has been gessoed and the one on the right just plain paper. You can see that the Distress Crayons don't look very smooth on the right side and it's picking up the texture of the cardstock.

So if you want a smooth, more blendable version of Distress Crayons, make sure to slap some gesso on the page first. 

And now, back to the card: 


Over the Distress Crayon background, I used some gold texture paste through a stencil. Next, I stamped the teacup from STAMPlorations Always Tea Time set and paired it with a sentiment from my Literary Caffeine-ations set.  I colored the cup in with Spectrum Noir Markers. 

This little shabby chic mixed media number made me oh-so-happy so I was DONE! 

Thanks for popping by my blog to check out my card. 
I'd love to see you play along at the Card Concept this month!
Go check out what the rest of the talented Design Team made HERE


Friday, May 20, 2016

What if you Fly Stamped Card with Stenciling

It's reminder time. So here I am. Reminding you.

Go play in the STAMPlorations theme & sketch challenge already! Really - this month is an anything goes theme, so why not? You can use any stamps/products you want to AND you can win cool prizes. Win win win.


For my card this go-round, I didn't want to use the sketch, so I just used the anything goes theme and had a little mixed media play.

It all started after I stared at this background:

distress_crayon_background_for_card

Soooooooooooooo pretty, right?!
Just kidding - you don't have to humor me, I know it's gaggingly gross.

This background was made while I was experimenting with Distress Crayons. Let's just say that this particular experiment did NOT impress me - haha.

BUT, much like with all my "ICK" creations, I decided to try gesso on it before I pitched it in the trash bin. 

making_card_background_with_gesso
 

I used the Foiled Again ARTplorations stencil and painted some gesso through it. 

Folks, I'm convinced that gesso was created by the great magicians of lore because it can fix ANYTHING.  All of the sudden, this background that gave my eyeballs a good coating of bile suddenly looked a teensy bit appealing!

mixed_media_card_background


I still wasn't super happy with it though, so I took a Distress Marker and started outlining some of the shapes.  The outlines seemed a little bit to harsh and clean, so I used a wet paint brush to pull some of the color into the centers of the shape and muddy down the edges a bit. 

Once the background was dry, I stamped over it using a script from the Mixed Media Elements stamp set and sponged the edges with Black Soot Distress Ink.


mixed_media_stamped_card

I then embossed feathers from the Trendy Feathers 2 set and used the same Distress Marker to add spot color. I stamped a sentiment from the Strong Women stamp set and used a Spellbinders die cut with some faux hand-drawn stitching as a focal panel. 


I tied the look (literally) together with some teal twine and a vintage gemstone from an old earring. 

If a starting off point helps, use our sketch to give you some inspiration. Otherwise link up ANYTHING this month for you chance to win at STAMPlorations


So the next time you're making something and just don't quite like it - GESSO to the rescue! 

I'm also going to link this creation up to:
Craft Stamper Magazine - Anything Goes 
The colors of my creation were inspired by ColourQ
Try it on Tuesday - Spots Dots & Dashes
Take It, Make It Challenge 

Thanks for flying by! Hope you liked my creation today! 

Monday, May 16, 2016

My Craft Room Remodel, Supply Organization, & General Awesomeness

EEEEEEE! I'm so excited to finally get to share with you my craft room remodel! I finally got off my lazy arse and took some photos and edited them and now that particular arse is sitting on the couch and typing this post so you can FINALLY all share in my eternal happiness!!!


craft_room_remodel

When we purchased our new home, the garage (which is a separate structure from the house) came with 700 square feet of finished living space. Part of that space is a big ol' "man cave", as my significant other has dubbed it. But the other part was a poker room/bar area. During our initial walk-through I instantly fell in love with this particular room, because I just KNEW it would make my dream craft studio possible. 


craft_room_makeover


Here it is in all its full glory! Isn't it beautiful?! It truly is my new happy place. I love walking into this, with the daylight streaming through airy windows and the smell of ink heavy in the room. I l-o-v-e creating things in here! 

So let me give you a little tour!

The craft table was custom built by my fabulous boyfriend and amazing brother-in-law.

building_a_custom_craft_table

This is my brother-in-law in action.

The table is 10 feet long by 5 feet wide. The base is made of cube storage shelves (purchased from Lowe's). The top was made by cutting 3 pieces of plywood to size and covering it with a white laminate (ordered from Home Depot online). 

I put red storage containers underneath the table to hold things like my ribbon, burlap, and miscellaneous hodge podge.


Taaaaadaaaa! This is my back focal wall. I knew right away that I wanted to use my Distress Products as a sort of decoration. And boy did I ever! When anybody walks in to the room they are smacked with a veritable smorgasbord of color, pulled from all of my favorite products. 


craft_room_renovation

My boyfriend, drilling the back shelf into place ("You have to have a few process photos," I explained to him as he complained about my picture taking obsession duty).

The shelves and cupboards were all purchased from Lowe's over by the laundry storage section. If you get cupboards from the laundry section versus the kitchen section, it cuts the price by well over half. The tall cupboards were about $120 each and the shorter cupboards were $79 each. 

The back wall also has all of my essential tools, such as my paper cutter, my Cuttlebug, and my MISTI. 

craft_storage_supply_organization


Up top, the room is decorated with cards sent to me from my bloggy friends from around the world.

tim_holtz_ranger_distress_paint_organization


Underneath that is a row of Tim Holtz Distress Paints, Distress Spray Stains, and Distress Crayons. 

The products are all arranged on 24" floating shelves, purchased from Menards. 

Tim_holtz_ranger_distress_spray_organization

Zigzag! haha

This wall is not only beautiful, it's sooooo great to have all of my fave products at immediate hand. I use them constantly and now I don't have to rummage around for ages trying to find which color I want. 

storage_for_tim_holtz_distress_inks_and_reinkers

My absolute favorite feature of the room is the storage for the Range Distress Inks. I used nail polish display stands! I used ones that are 6 racks tall and ordered from Amazon. (Here's the link to find them, if you'd like.) They hold 4 Distress Ink pads and their reinkers absolutely perfectly. 


stamping_supply_organization_with_pops_of_color

I also used pops of color inside my cupboards (because let's be honest - they're gonna be open all the time anyhow). This is the cupboard where I store my stamps. I have them in pull-out containers so they can easily travel from cupboard to craft table. 

cricut_station_for_craft_room

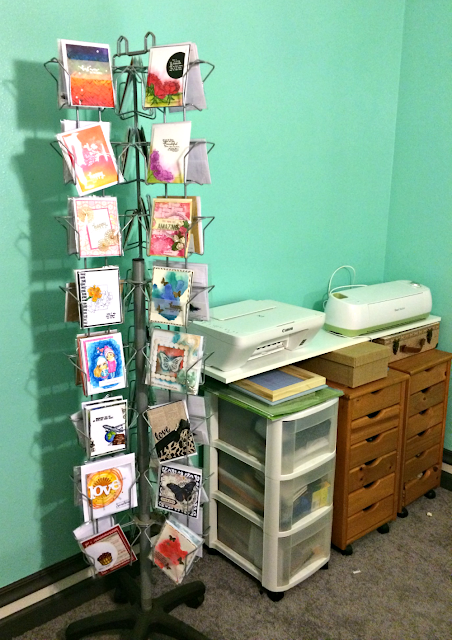
Along the front wall, I created a computer-based station which houses my printer and Cricut Expression. I also have a card rack to showcase my designs and store the finished cards so they don't get ruined. Underneath the station I have wooden draws that are filled with miscellaneous embellishments for cards. 


^^This is my face after everything was all done^^ 

This face was made possible by the following people:
My super-awesome-deserves-10-backrubs boyfriend, Jimmy.
My incredible brother-in-law, Nick, who helped with the table.
My awesomesauce cousin, Danielle, who painted like a mofo.
My sister, Allie, who painted (mostly Danielle but some walls, too)
And Jimmy's uber-handy dad, Mike, who helped with SO much!

SO SO SO Thrilled with all the craft supply storage, amazing drool-worthy craft table that holds 10 people comfortaby, and a place for every craft tool that I own. It truly is my dream craft studio!

custom_handmade_craft_table

If you like it, then be sure to put a Pin on it! :) 

Thanks for popping by and I hope you love it as much as I do!

Wednesday, May 11, 2016

Card Concept Guestie - It's Me! Sunshine Mixed Media Card


I'm so so so excited because the amazing Lesley asked me to be a guestie for the Card Concept!! >>insert happy dance here<< Their design team is SO talented and filled with top-notch cardmakers from ALL aesthetic backgrounds. CAS, shabby chic, mixed media - you name it!


I was thrilled when I saw the inspiration image because I'd just purchased the Rise Above set from Verve stamps and knew exactly how to put the adorable little sun to use.


I started by creating some faux grungy polka dots on a group of tags. 


distress_spray_stain_tagusing_distress_crayons_for_cards

 First, I sprayed my tags with a trio of yellow Distress Spray Stains - Scattered Straw, Squeezed Lemonade and Fossilized Amber. Then I ran them through a polka dotted embossing folder and used the Vintage Photo Distress Crayon to highlight the raised areas. 


card_background_with_tim_holtz_distress_spray_stain_and_texture_paste

Next, I made a background using Distress Spray Stain (Wild Honey, Spiced Marmalade, Scattered Straw), gesso, texture paste and heated embossing powder. 


mixed_media_distressed_card


I die cut the sun from my Rise Above set and embossed a sentiment from the same set. I outlined my sun and the tags with a bronze metallic Faber Castell Pitt Artist Pen and added some cork letters. 


mixed_media_sunshine_card_with_distress_crayon_and_stain

I backed the image with some DCWV printed burlap and put the whole thing together. It's so bright and fun and textural. I definitely loved playing and trying new techniques to create this little lovely. 

I'll be a guestie with the Card Concept for the whole month of May so you'll have to stay tuned to see what else I've created. In the meantime make sure you head over to see what the rest of the incredible design team produced!

I'm also going to send this over to the Anything But Cute Challenge, who are having a Anything Goes Challenge Mixed Media Challenge . 


Thanks for popping by! I hope you'll leave me a comment or follow my blog so I can return the favor!

Friday, May 6, 2016

Blooming Marigold Card - STAMPlorations May Challenge

Just a quick post from me today. I hope you all had a fantastic Mother's Day weekend - I know I did! My momma visited me, along with two of my aunts, and we spent the whole weekend out in my craft room. 

Speaking of Mother's Day, here's a card I made to celebrate the occasion.


 I used flowers from The Birds and the Blooms set, a border from the Artsy Border Maker set and the sentiment is from my Strong Women set. I drew in the frame around the masked flowers and watercolored one to make it POP! 


This card was based on the new STAMPlorations theme and sketch challenge.


That's right - you're in luck! This month is an ANYTHING GOES challenge or you can use the sketch. So use whatever stamps/products you have and come play along with us!  


Sunday, May 1, 2016

Reflection Card - Mixed Media Card Challenge

I'm late! I'm late! For a very important date! Stupid blogger got me again with their stupid Publish/Save button. YESTERDAY this was supposed to go live, but it'll just have to do today. 


Up at The Mixed Media Card Challenge, we've got a whole new theme for the month: Reflections with the optional element of water. 


I stared at this for a good long time in dread. Dun Dun Dunnnnnn!

I've never attemped to do anything with reflections on a card before because I know it takes precision and a certain sense of artsyness. Both of which I'm lacking. I don't mean to imply I'm not artsy - but MY version of artsy involves messiness that all somehow seems to magically resolve itself into a pretty design. NOT things placed for any particular reason. haha.

But, I rolled up my shirtsleeves and decided to give it a go. 

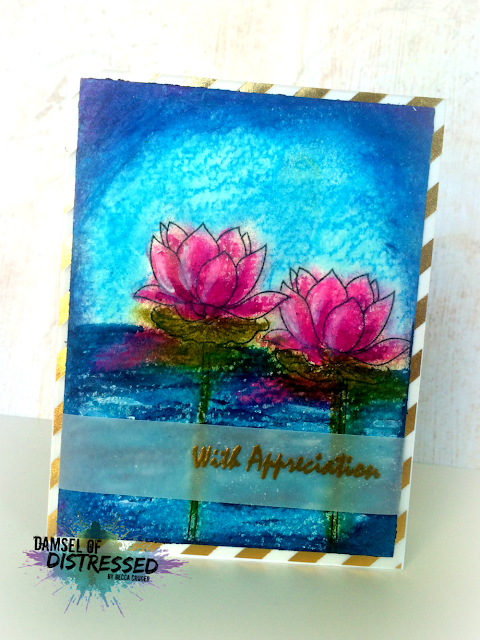
The first thing I did was to stamp my image which are these lovely lotuses (loti?) from Dee's Artsy Impressions Lotus Love set.  And then I started scribbling with some Distress Crayons. 

card_making_with_Ranger_Distress_Crayons


I wanted to create a sky and water with the lotuses helping to break up the background and the foreground. I scribbled Broken China Distress Crayon for the water and punctuated it with lines of Chipped Sapphire. Next, I colored the flowers and lily pads and made sure to add some of the same color to my water area to create a "reflection".  Then I used my finger to smudge and blend colors together.

making_art_with_distress_crayons

I added some white to the edges of my flowers for a little bit of highlights, and then used a Chalk Marker to add white highlights in the water itself (the white Distress Crayon just wanted to blend so I switched to a chalk marker.) 

I used a lighter blue gelato for the sky (since DCs only come in certain colors right now). 


mixed_media_card_with_ranger_distress_crayons


I added a vellum strip and a gold-striped vellum background to seal the deal and make the whole thing complete. 


I may not have known what the heck I was doing, and I certainly haven't mastered this technique, but it was fun to stretch my creative muscles and attempt it! I hope you'll stretch your muscles with us and come play along at the Mixed Media Card Challenge. 


I'm also linking this up to:

OUR BLOG BADGESimon Wednesday Challenge Blog

House of Cards - Use Vellum or Acetate
613 Avenue Create -  ATG with option of Beach or Nautical 
Simon Says Stamp Wed - Anything Goes


Thanks for popping by! Leave me a comment or follow my blog and I will endeavor to do the same for you!