Friday, December 7, 2018

Glittery Snowflake Holiday Card

Is anyone else busy huffing glitter in their craft rooms this time of year? There's something about the holiday cardmaking season that brings out my innate love of glitter and intensifies it to an all-time high. 


...

Sorry, I got distract by glitter for a second and had to stare at the photo above before I could continue.

Luckily, whether you are a glitter fan or not, STAMPlorations has you covered. Our Theme and Sketch Challenge has two great options for you to craft your heart out AND win some pretty sah-weet prizes. 

This month's theme is:


And this month's sketch is: 

You can choose to play along with either the theme or the sketch, or mash 'em together and play along with both! 


I made this sparkly background using Ken Oliver Color Burst crystals and covered it with a layer of Faber Castell Glass Bead Glitter Gel, smooshed through the Old Rose Prints mini stencil


I added some chipboard snowflakes, plus glittery snowflake embellishments and embossed a big ol' sentiment (Merry & Bright - Typografia Christmas) to complete this holiday card. 

All-in-all if you're looking for quick and stunning cards to send out this Holiday season, totally pin this design because it packs a big bold punch while being pretty simple to put together.

Pssssttt right now if you use code DECEMBER2018 you can get 30% off your order of stamps in the STAMPshop. Plus if you use code STAMPGIRLBECCA you get an extra 10% off. So treat yourself or some of your fave crafters to a snazzy and low-cost Christmas present! 

Monday, November 12, 2018

Giving Thanks Blog Hop


Hello my fabulous bloggy friends! It's the 4th annual STAMPlorations giving thanks blog hop! It's one of my favorite times of the year - when we get to give thanks for all the awesome things in our lives. STAMPlorations has sure been an awesome thing in my life and I hope you join our hop-a-long to see just how awesome the STAMPfamily is! 

I got to use this G-O-R-G-E-O-U-S Doodled Autumn Pumpkin cover plate die and a brand spankin' new big ol' sentiment die - Grateful Heart phrase die.


I used three different sheets of paper along with the die - yellow, green and orange. For the pumpkin, I rolled the orange cardstock through an embossing folder, and then brushed the raised surface with a lighter orange Inkagold to accentuate the texture. 


I just love how this card turned out. It's simple to make, but it's got a huuuuuuuge visual impact. 

You guys. there is a HUGE sale going on at STAMPlorations. From today until November 30, you can get >>40%<< off stamps, stencils and dies at STAMPlorations (excluding new release, retiring, and Stamp Club stamps). 


Plus check that out! Even more discounts and goodies to give away if you use my code STAMPGIRLBECCA. 

So go link up your card and hop along, then shop along for some awesome prizes! 

Monday, October 15, 2018

Stenciling Techniques - Sanna Lippert New Release

It's a paaaaaarty! A new release party that is! Sanna Lipper, one of the fab-o designers at STAMPlorations has released a whole new line of stencils. And we got to have a crafty play. They are all so gorgeous and perfect for mixed media play.


Today I'm going to be showing you a cool stenciling technique using Distress Oxides. 
This technique is actually the reverse of stenciling because you're taking OFF the color with a stencil, instead of applying it. 


Step 1: Sponge on a healthy layer of Distress Oxide onto a dark piece of cardstock. Because oxides are highly pigmented, they are designed to sit on top of the dark color. I used Broken China Oxides over a navy blue paper. 


Step 2: Bust out your stencil and tape it down so it won't move. Dampen a piece of paper towel, using a small amount of water (you don't want it too wet or your cardstock will pill). Wipe wipe wipe wipe wipe. The color will start to lift right off.


Step 3: Remove stencil and oooh and aaaah... I love the pattern of this Cornflower stencil.


I also splattered it all over with Picket Fence Distress Spray Stains.

Next, I made a correlating embellishment - also with my stencil.


Check out all that texture! Basically I swiped a layer of texture paste through my stencil, then added a layer of blue embossing powder before heat setting.

I fussy cut it and BEHOLD!


Isn't it pretty? 

I also played around with Sanna's new Lupinus stencil, too.


This one is so pretty and would be perfect for either mixed media OR clean and simple cards. 


Pssst in honor of this new release, all ARTplorations stencils are 15% off. and you get a FREE stencil with every order. Plus you can use my code STAMPGIRLBECCA for an extra 20% off your order. :)


Now go get hopping and then get shopping. 

Friday, October 5, 2018

STAMPlorations Challenges are BACK!


I'm Baaaaaaaaaaaaaaaaaaaaack!


You may have noticed over the summer that I took a little hiatus from regular blogging. That's because I was crazy busy with some of the art shows I'd signed up for, plus doing some community work. Stay tuned early next week and I'll share some of my summer hijinks with you. 

But for now, I'm here to tell you that STAMPlorations challenges are back, too! They also went on a little summer break. But now we've got a whole new crop of fresh challenges and great prizes. 

The sketch this month is:
And the theme this month is: 


You can play along with either the sketch or the them OR both! Options!

For my design, I decided to work with the theme. Believe it or not, we had our first snowfall last night and so I'm already wistful for Autumn. *sigh*

The first thing I did was to add a layer of prettiness to a sheet of mixed media paper. 


I used these Ken Oliver Color Burst Crystals and Liquid Metals to create a flowy, vibrant background. 


Over the top of that, I added a layer of Faber Castel Glitter Bead gel through the Botanical Lush stencil. Because let's be real here, everyone loves glitter. 

Once that dried, I speckled the background with green & red Distress Spray Stains. 


I double stamped a leaf from the Trendy Leaves stamp set, using Fired Brick Distress Ink and Fossilized Amber Distress Oxide. 


Added a sentiment from the Buttercups & Butterflies stamp set, some ribbons, a little glue and BAM! One gorgeous Fall card. 

Pop on over to play along in the STAMPlorations theme & sketch challenge and to see all the other crafty inspiration. 

PSSStttt - if you're looking to add to your stamp collection, you can get 20% off anything in the STAMPstore using code STAMPGIRLBECCA

Saturday, July 28, 2018

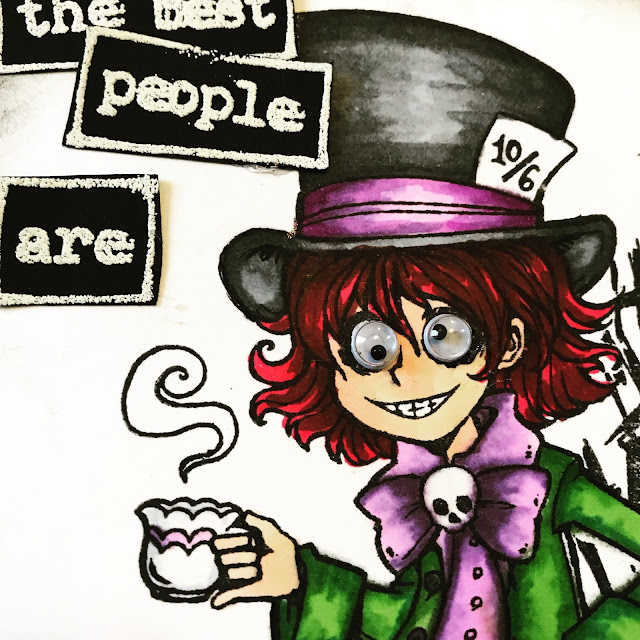
Mad Hatter Tea Party Card

All the best people are bonkers! I've never identified with a Disney phrase more than I have that one, which was spouted by the Mad Hatter in Alice and Wonderland. 


Visible Image just unveiled a whole new Wonderland stamp line featuring Alice in Wonderland characters and they're all so much fun. 


I got to have a play with The Mad Hatter set and, as you can see, added some googly eyes for the full crazy effect. 


I stamped and masked Mr. Hatter so that I could add some of the crazy laughter to the background. 


Ensue laughter stamps. And more laughter stamps. I went a little overboard haha! 


Next, I used some Spectrum Noir alcohol markers to color in my image and smudged up my outside edges with black Faber Castell Gelatos. 


I added a sentiment phrase using the same set, and some pretty patterned paper to match - glued on the googly eyes and viola! One crazy mad hatter. 

Thanks for popping by! Make sure to go check out the full Wonderland release and prepare to be amazed! 

Friday, July 27, 2018

STAMPlorations + Coffee Loving Cardmakers Blog Hop!

Did someone say fancy prizes?! If not, they really should have because the Coffee Loving Cardmakers are teaming up with STAMPlorations for a brand new release of their new Zen Coffee 2 Cover Plate Die.

You should have come here from Amy's lovely blog


This die is all sorts of beautiful and I decided to embark on what turned out to be my most ambitious project ever. 


Isn't it beeeeauuuutiful?!?! 

It was also 5 1/2 hours of work. 

But never mind that. 

Isn't it beeeeauuuutiful?!?!


I decided to do an inlaid die cut technique, and to individually handpaint every single piece. 

So yeah... I am stupid. Fully admit it... but the end outcome make it totally worth it.


If you're wondering how I got those pieces so shiny, that would be the magic of InkaGold - which might be my favorite product of all time ever.

I think it looks like a stained glass window piece!


In the end, I opted to frame this baby and hang it in my dining room where I can oooh and aaaah over it every morning while drinking my morning cuppa. 

So here's some other things you need to know: 

You should continue the hop at Dana Warren's blog because STAMPlorations is giving away a $25 gift card for you to pick out any product you want.


Also - if you're a coffee lover like I am (or a tea lover like I am not) STAMPlorations is having a sale all during the hop - 25% off any stamp in their coffee/tea category.

Friday, July 20, 2018

Fun Stampers Journey + Coffee Loving Papercrafters Blog Hop

Today the Coffee Loving Cardmakers team is pairing up with Fun Stampers Journey for a super fun and inspirational blog hop. You should have come here from Lori Turner's blog.


I absolutely love, love, love the quality of FSJ products. Their stamps are sooooo fleepin' cute and I can't wait to show you what I made with thier die cuts, too!


I inked up the Coffee Helps stamp set using some Walnut Stain Distress Inks. 

Image result for fun stampers journey coffee helps 

I painted in the plate using some gold Distress Paint to give it a pop o' elegance and then I splashed the same gold paint on a Hello Word Bubble wooden embellishment. 


A little stamping in the background with the coffee stain stamp, and then some more gold paint and viola! I a clean and simple mixed media card with a whole lotta personality. 


Since clean and simple cards are the complete opposite of my normal style, I had to go back to layering it up and my next card is a shabby chic creation. 


Layers and layers and burlap and twine and lace and die cuts - oh my!!! 

I used the Coffee Helps die set and some pretty paper from Bo Bunny to create my coffee mug.

Fun Stampers Journey is giving away a $25 gift card to a lucky hopper! So hop along, comment on all the blogs, and get some inspiration! Comments close on July 27.

Next up is Dana Gong's blog

Happy Hopping!

Friday, June 29, 2018

Just Be Happy Card

Happy Saturday to all my UK friends and Friday to all my US friends! 

I am jumping up and down with excitement to show off this latest design... Well more like the stamps that I used are jumping up and down. ha! 


It's been a great week filled with tons of community happiness and fun here in Grand Forks, North Dakota. So as I was rifling through my stamps to find the best one to use in a design, I stopped dead in my tracks at Tomorrow Doesn't Exist. It's so full of movement and life! 

To echo those sentiments, I wanted to create a colorfol and vibrant background. 


I used some Ken Oliver Color Burst powders on a sheet of white paper and spritzed them with water to get them good and inky. 


I topped my sheet with the Fibres stencil and sprinkled on some Black Soot Distress Spray Stain, followed by a healthy dose of Spiced Marmalade and Barn Door Distress Spray Stain. 


Ooooo color. :) 


I embossed a big ol' happy sentiment from the Tomorrow Doesn't Exist set, and also embossed some of the gears from the Somewhere In Time stamp set. 


Add a healthy layer of glue to the mix and viola! 


One super fly, happy, vibrant, cheery design. :) 

Thanks for popping by. Now go check out all those fun stamps in the Visible Image shop!