Showing posts with label Chipboard. Show all posts

Thursday, March 2, 2017

Sailing Away - Fusion Challenge

Sailing, sailing, sailing. Somewheeeeeere. Beyond the seeeeeeeeaaaaaa. 

*warning: brief-but-entertaining off-topic tangent ahead*


nautical_happy_birthday_card_men_sailing_ships


Do you want to know what that song always brings to mind? Back in my junior high days I realllllly wanted to lose some weight (hah... if I was only that skinny now) and this was pre-Netflix, Hulu, Youtube workout video on demand.  My mom had this old copy of Richard Simmons Sweatin' to the Oldies and my sister and I would clamber off the school bus and watch good ol' Richard in is upper-thigh-baring 70s track shorts and try to do our best follow along. Beyond the sea was always my fave song, because it meant we were cooling down and the VCR tape was almost done. 

Haha - good memories!

BUT the real reason we're all here is for a card, yes? 


Before I show off the finished design, check out that faaaabulous inspiration image & sketch from Fusion this fortnight (pssstt...... I'm just learning now that fortnight means two weeks. I always thought it was a fancy way of saying month, but NOPE. I feel so British when I say it, too. Try it! And then have some tea and crumpets.)

Woops... I didn't warn you about that tangent. 

If you haven't played along at Fusion before, I love it because you can choose either the sketch OR the inspiration image, or you can mash the two together (which is what I chose to do). 

masculine_birthday_card_guy_ship_sailing_nautical

Mix and matching patterns anyone? Thanks to Simon Says Stamp's Sailing Away set and coordinating papers, I was able to do just that with ease!

The inspiration image made me use all those different stripes and patterns, and if you squint you can see a little ship on the countertop. I also used the sketch as a base for my design. 

I'm also going to play along with the following awesome challenges:
Sisterhood of Crafters - Destination/Travel
Use Your Stuff - Use a Sketch of your choice
Come and Get It - It's in the Male 


Well that's all for me today, folks! I hope you take time to go see what the rest of my Fusion Friends did and then play along yourself!!

Wednesday, December 14, 2016

Stenciled Mixed Media Snowflake Holiday Card

Hippity hoppity stencils on their way! Today at the STAMPlorations blog we are doing a fancy-dancy ARTplorations Stencil Hop where we're showing off all the fun techniques you can do with stencils.


As per my regular MO, I decided to get all messy and inky and create a mixed media card. Since Christmas cards are still very much needed (woops!) that's what I decided to focus on.


Before I get too far into the weeds, I wanna talk about the logistics of the Hop - For the next 7 days, we're showcasing stenciling techniques and we'll be giving away at least >5< prizes to those who hop along or make a project featuring stenciling and link it up to our Linky Party Gallery. Check out all the details here.
stenciling_with_ken_oliver_watercolor_crystals
Now, back to my tutorial. I used the Broken Glass stencil for my background and did a little bit of experimentation. This isn't a technique I've tried before - but I'll definitely be trying it again! I spritzed my paper with some water, and then I sprinkled my Ken Oliver Colorburst powders on to the paper. 

Using a paintbrush, I moved the colors around, and left some of the crystals still intact. 


ken_oliver_color_burst_watercolor_crystals_background

I wound up creating 4 different backgrounds - one with a dark usage of powders, one with a light usage of powders, and 2 where flipped my stencil over onto a blank piece of paper to capture the "extra" powder that was left on the stencil. 

OoooooOoooo.


I also used some Distress Paint and Distress Spray Stains to die a piece of gauze for additional texture. Lastly, I altered some chipboard snowflakes with Picket Fence Distress Paint and some sparkly embossing powder. 

 mixed_media_card_christmas_card_snowflakes_stamping

My sentiment is from the Holiday Sketches: Christmas Candles set.

I hope you think this is as pretty as I do! It's so frosty - I can almost feel the crisp winter air just by looking at it! 

Please come join us in our ARTplorations stencil hop! Can't wait to see what you dream up!

My card is going over to play along in:
Mixed Media World Challenge - Winter Wonderland
Mixed Media Mojo - Winter Holiday with a  Sparkle Twist

Simon Say Stamp Monday - Let there be snow


Tuesday, March 1, 2016

Mixed Media Card Challenge - Trees

It is officially the end of winter!! Welp, meteorological winter anyhow... I wish Mother Nature would get on board because yesterday it was -18 degrees here in North Dakota. Sigh*

But at least I can pretend everything is green and delightful, right?! If I can't grow trees and green things in my back yard, at least I can color them on a card! Wooo! 


coloring_with_gelatos_cardmaking

That's because over at the Mixed Media Card Challenge our theme o' the month is TREES with the option of birds. 


I started out thinking I'd make this a bright, happy summery card... and you may have noticed that didn't work out so well for me. 


How_to_color_with_gelatos_for_card_tutorial


It's still bright and happy, mind you, but as soon as I scribbled on some Gelatos, I thought it looked more like night time than a summery day. And so, a plan was born! 

In addition to the Mixed Media Card Challenge, I wanted to play along with Ms. Darnell-the-Fantastic's NBUS (Never-Been-Used-Schtuff) challenge


I have used these adorable houses from Shirley Bampton's Bee's Knees - Houses stamp set before, but I'd purchased the accessory pack with cute trees and mailboxes and roads and they've just been sitting about unused for months! Thanks for the impetus, Darnell!

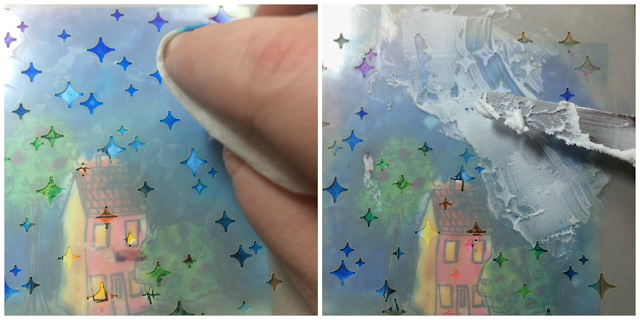
Once I'd blended the gelatos with my fingers, I used the Big Bang Sci-Fi Screening (stencil) from Winnie and Walter along with a baby wipe to pick up some of the gelatos.  


Unique_techniques_for_card_making

When I was satisfied, I repositioned the stencil and added some texture paste to give my night sky some texture. I also changed the house color to be more purpley because I wasn't totally in love with how the pink was meshing with my colors.

Then I added some finishing touches - graphic washi tape and a stripey chipboard sentiment - which makes it perfect for the Allsorts challenge of "Sentiment in Focus".


mixed_media_card_tutorial

Et voila! This little number is going to go to a friend who is buying a house tomorrow. Awww! :) 


Wednesday, January 20, 2016

Snowflake Card with Distress Ink Smooshing Technique

Today, I've got a super awesome tutorial to share with you and it's all about altering chipboard with perfect pearls. 


Perfect_pearls_tutorial

I really love to use wooden veneer or chipboard. It's a really simple way to give a clean and simple card a little something extra. Sometimes I'll use the plain old wood, and sometimes I want to do something a little fancier. This happened to be one of the fancy times. 

Our current challenge at STAMPlorations happens to be Clean and Simple (or you can choose to use the sketch) (or you can do both) (I just like parentheses). 


I chose to doll my wooden snowflakes up by using Perfect Pearls. There are many different ways to use Perfect Pearls but today I'm going to show you how to create a shimmery, metallic look with them. 


altering_chipboard_with_perfect_pearls

It's easy! Hardly any steps are involved - just pour a little bit of powder into the cap and mix with a few drops of water to make a paste. Then apply to the chipboard. You can use as many coats as you want to build up the opacity. 

altering_chipboard_wooden_pieces

I used a shimmery white and a shimmery turquoise and then I added some rock glitter while the pearls were still wet. Because why not? It turned out really cool! (pun intended)


I also knew that I wanted to play along with my girl Jenn Shurkus's and her friend Audrey's Coolest Card Series challenge. This week they are focusing on watercoloring techniques - and using snowflakes/snow/snowmen.

blue_shades_of_Distress_Ink_Dipping_Technique

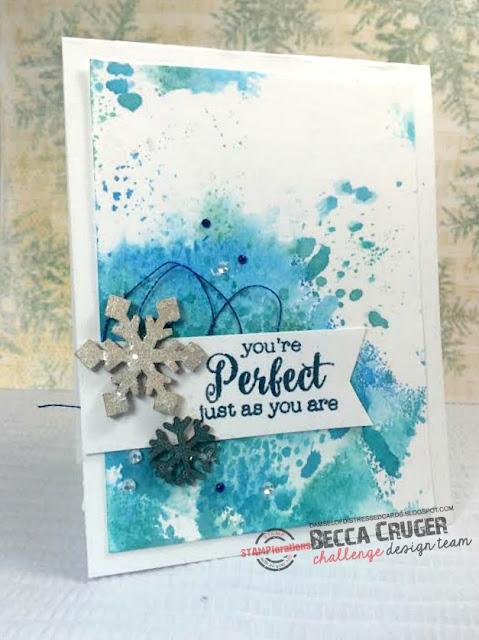
I made a watercoloresque background using the Distress Ink Dipping Technique and Salty Ocean, Peacock Feathers, and Evergreen Bough. 

Then I embossed a sentiment from the STAMPlorations Fond Expressions 2 stamp set and put the whole kit and caboodle together. 


snowflake_card_with_distress_inks

You've still got plenty of time left to play in the STAMPlorations challenge! I hope to see you all there!

As for me, I'm also going to play along with:
Clear it Out - Winter theme with snowflake stash
Sparkle N Sprinkle - ATG with loose glitter & embossing
Card and Scrap - White and Blue

Thank you for popping by! I hope you enjoyed the tutorial! 


Friday, June 5, 2015

Mixed Media Card with Washi - STAMPlorations June Challenge

This may be my favorite card I've ever made. Yes. That is a big statement. 


The challenge going on over at STAMPlorations is Stamps and Washi Tape. 
For some reason, washi always makes me think messy mixed media... oh darn... I HATE that. *Snicker*


First, I applied a layer of gesso to a piece of deep red card stock, let it dry, and then sprayed it with a concentrated burst of Festive Berries and Black Soot Distress Inks. 


Once that was dry, I added some layers of black and white washi tape, and some grungy stamps from the Mixed Media Grunge set. 

I added a black doily, some more grunge around the edges and one of the birds from 
SmallBirds - The Bee's Knees. To give the bird a more charcoally effect, I used Faber Castell Artist Pens and smudged as I went along the lines.  I also drew some sketchy circles using the same pens. 

Distress Spray Stain, Gesso background


Yeah - pretty much in love. 

This card is going over to the following challenges: 

Mixed Media Monthly Challenge (HAPPY BIRTHDAY!!) (I'm choosing birds of a feather)
Quoth the Raven - Picture Inspiration


Make sure to play along over at STAMPlorations!! You have until the end of the month and we've got great prizes, along with some awesome guest designers, including Rahmat Gouse and Carol Dunham!

Thanks for taking the time to pop by! 

Friday, May 1, 2015

A Leafy Art Journal Page - STAMPlorations May Challenge

Texture! Color! Technique!
That's what I've got in store for you today, my lovely readers! 
It's the first of the month and time for a new monthly challenge over at STAMPlorations. This month's challenge is:


We like entries done in any style! Have a CAS flower card with leaves? Link it up! Have a mixed media masterpiece with autumnal touches? Link it up! 

I definitely opted for the latter as I was feeling like getting a little bit messy. Many of you know that my big project this year is to put some of my poetry along with corresponding artwork. I've already made one page (you can see it here if you'd like) and have really wanted to be considerate of the design when moving forward, so I'm taking my own sweet time. 

Here's how I created my second page, with my poem called Autumnal Lullaby. 


First, I applied a layer of gesso and, while it was still wet, stuck in bits of crumpled up tissue paper to create a textural base. The gesso allows my next layer to go on the page and blend easier. 


Next, I dobbed on some Distress Paint in Mustard Seed and Fired Brick. If you haven't used Distress Paints before, the thing that makes them unique is that they react with water.

Give 'em a little spritz with a water mister and they start doing happy dances all over the page. 

Depending on which way you twist and turn your page, the paint will drip into itself and start creating unique color combos that just weren't there before. Magic!


The last picture is a combination of three steps, First, I used a crinkled paper towel to dab up some of the paint and to create a sort of leaf veining texture in the background, I also spritzed on some Bronzed Copper Distress Spray Stain and painted on a shimmery border with Perfect Pearls (Forever Red). 

I added my poem and incorporated it into the design by using some of the leaves from the STAMPlorations Trendy Leaves set, along with some stenciling work from the Nested Circles ARTplorations stencil


I double stamped the leaves using different Distress Ink colors, but in to make them really pop, I used a Faber Castell artist pen and outlined them, then smudged the outline to create some charcoally (that's a word, right?) shadows. 


I added some wood chippies for more texture. And here you can really see how lovely that tissue paper looks. 


One of the cool elements is this dangly wooden piece. It's actually an old earring. My mom and dad go to a lot of auctions and do junk sales during the summer months. Last time I was home, she had a whole box of mismatched earrings that I heroically saved from the garbage can! Just call me SuperBecca!


Anyway, that's what I have for you fine folks. I totally think you should go get messy now too and link up some awesome projects to our challenge over at STAMPlorations. There's cool prizes for you to win, plus we give you lots of great recognition of your artwork. 

I'm also going to link this up to the following challenges: 

Addicted to Stamps and More - Make your Mark (p.s. I tried to find if I could enter things besides cards here, but it didn't say. Just let me know if I can't.) :) 
Craft Stamper Magazine - Take a Stamp
 
Mixed Media Mojo Bingo: (I went gesso, stencil, chipboard)

Thanks for popping by! Leave me a comment or follow my blog and I'll be sure to head your way, too!


Saturday, November 1, 2014

How to Organize All Those Card Making Challenges

Holy schmoly! This girl is crafted out today. I spent all day long on one project, but I'm so excited to share it with you that I just couldn't wait (even though I've already posted once today)!!

I've been following a lot of card making challenge blogs. It's been so much fun to participate and even if I don't win, there is so much inspiration that it keeps me in my crafting room and constantly creating.

But the problem is, there are quite a few challenges out there that I follow, and that means when I want to go looking for inspiration on my feed I have to click, scroll down, scroll back up, click on the next blog, scroll down. Repeat until I find something that just clicks. It's also bad because sometimes I forget about challenges and remember just in time to realize they are already closed. Bummer!

 AAaaaand when I want to combine challenges, like a sketch, word, and a color challenge, then I have to have multiple tabs open and refer back to my computer during the process. 

 I really like to watch PBS specials (yes, I'm a nerd) while I craft...sooooo...kind of need my computer. I got this genius  CRAZY (I've now come to admit this) idea to create an inspiration board that helps me keep track of all the challenges.


Firstly, I went looking for some colors from one of the challenge blogs I follow and after much back and forth debating (this is going to be displayed permanently in my craft room, after all) I settled on Curtain Call's Boho Brights challenge. Who doesn't get inspired by bright and cheerful colors?


It all started with this old window that somebody was selling on a garage sale facebook site:


I gave it a thorough scrubbing and, with the help of some handsome muscle, mounted it on my craft room wall.


Next, I used some of my favorite products - Distress Inks and Stencils!
The bright DI colors are Mustard Seed, Broken China, Dusty Concord, Shabby Shutters, Spiced Marmalade, and Festive Berries


I made some day of the week blocks with tiny wooden squares and white puffy paint, to help remind me when a challenge is ending.


Next, I took some gold cord, and ran seven strips down the window and attached Tim Holtz clips. These will help hold the inspiration images. 


I made a title for my project using chipboard letters and dabbing them with DIs.
After some thought I decided to go with "Inspiration Station".


One trusty glue gun, a couple of second degree burns, and a few hours later....


I have a finished project board!! Woohooo!! It's much grander in real life.


It's so bright and beautiful! I added some flowers and bling to the window, too!


Now as the challenges are announced, I can simply print out the images and put them in the row by the day the challenge ends. I follow more challenges than this, but a lot of them were announced today and I have to print them later.


Challenges that are bi-weekly or monthly are put on the day of the week they'll be due, but they're put closer to the top and the date is written on it.


I think I'm going to be inspired for a looong time to come!

Speaking of challenges, In addition to the Curtain Call challenge, I am going to make my third and final entry to the Simon Says Stamp Wednesday Blog "Anything Goes" challenge.


Hope you've all enjoyed my madness! Please follow my blog and leave a comment so that I can return the favor on your creations!