Saturday, November 29, 2014

I Loved You

You were there. Always. 

From the first moment I ever inked up a stamp, you were there.

You patiently taught me how to emboss. You smiled at each new creation I made and even fussed over the ones that didn't deserve it. 

Every year we would mark our calendars with a big red heart - Valentine's card making day with Grandma and Becca. I would make a collection of cards and you would be right there with me, across the table making your own. When we were all glittered out and there was simply no more craftiness that could be accomplished, we lined them up one by one, in order of our favorites. 


You'd help me decide which card matched whose personality. Without question, you gave me free reign of your stamps, your finest designer paper, and you always had any tool I could ever imagine - and gave free lessons to go along with them. I swear to goodness, I'll never know how you managed to complete a project with all the times you had to get up to find me that perfect something to finish a card.  

We'd turn on the radio to old bluesy hymns and both sing along while we crafted away. There was no one with a quicker smile or a kinder spirit. I don't know that I'll ever have a Valentine's Day that's the same again.

You were always there to foster my creativity and you were a true family matriarch. You organized themed "card parties" to get us all together, and your intricate coloring and use of dies is something I never could quite live up to. 

At the "Fancy Lady" card party 


At the Mardi Gras card party
You won the mask competition with your flamingo


You were a crafty guru, and never let anything stop you


My forever Valentine.


My Grandma Mead passed away this weekend. My greatest crafting friend and the most amazing woman. You were always the first to lend an ear, or give a needed hug. I loved you. So much. And I'll miss you. I'm grateful to have been able to give you my heart and that you took the time to show me yours. I'm grateful that I didn't just have a Grandma, I had a best friend. Always.


Tuesday, November 25, 2014

You Light Up My Life

Whew - I'm pretty sure that if I got any more excited for the upcoming week I might implode with happiness. I'm getting ready for a 5-day trip to visit my family. They all live about 6 hours away in Minnesota. Much to the chagrin of my mother, I moved to North Dakota for a job about two years ago and have been living in the frozen tundra ever since. AAAAaaand I'm going to get to meet my online bloggy friend and creative genius Betty Keefe, whose daughter is actually one of the only 600,000 people who inhabit North Dakota. Small world.

I have been so stuck on Christmas cards lately that my other stamps are now glaring at them with jealousy. Before there was a rubber mutiny on my hands, I decided to ink up a new set that I won from Inspired By Stamping. It's the Ahoy, Matey set and it has some AMAZING nautical images and is perfect for creating masculine cards.

Since it's Thanksgiving week, I decided to do a thank you card using the lighthouse from the set. 


Don't worry folks, my design aesthetic hasn't got completely out the window, those flowers won't be there for long. That's actually a piece of washi tape that I cut and used for a mask. The general premise behind this card was that I wanted to create beams of light going into the night sky. So I masked the "beams" and then sponged Weathered Wood and Chipped Sapphire Distress Inks onto the sky area. 


This is what it looked like after I removed the mask. I kept the Distress Inks intentionally blotchy to create a stormy and misty sky look. 


I also got a piece of cork that I wanted to play around with, and I thought it would make a perfect beach. I cut the cork into rolling hills and swiped the edges with Vintage Photo DI to give it dimension. 


I added in a blue piece of paper for the water, popped in my lighthouse, and then mounted tiny stars in the sky area to create a sparkly, shimmery night sky. Last but not least, I embossed the saying with white and stamped a big THANK YOU! on the inside. It's not my typical card aesthetic, and at first I wasn't sure if I liked it but the more I stared at it the more it grew on me. Maybe it's Stockholm syndrome? :)

I'd like to support the following great challenges:
Shopping our Stash - "Free is Good" (use something you got for free - My stamp set)
Simon Says Stamp - "Thanksgiving/Thank you"
TIME OUT - Embossing with the Optional twist of sparkle 
Inspired by Stamping - Customer Gallery

Thanks for stopping by! Follow my blog and leave me a comment and I'll be sure to return the favor!

Saturday, November 22, 2014

Ginger Blessings

My mouth is watering because I just looked through Jingle Belle's current gallery for their "Christmas Feast" challenge. In order to play along, you have to use a Christmas goodie (gingerbread, candy cane, sugarplums dancing in your head).

I just got in a set from Inspired By Stamping called Sugar and Spice that's PERFECT for this challenge. Look at these happy little gingerbread men (and women)!


To create this one-woman-homage to Christmas cuteness, I cut out the gingerbread cookies from craft paper and embossed their smiles. I added little teensy tinesy pearls for their buttons, and I may have cursed my large German fingers whilst attempting to get the glue side down! 

I also wanted to play along with this week's sketch challenge over at Mojo Monday and the Layer it Up Challenge at Little Red Wagon. 


So I used the sketch and layered. And then I layered some more. And then I added snowflakes and more of those stinkin teensy pearls. And then I sat back and grinned at the cute couple. 


I'm also sending this over to Inspired By Stamping's customer gallery contest

I'm really excited because I'm having my second annual EPIC Christmas Cookie bake (yes, that is the official, trademarked title) on the first weekend of December. You can be sure you'll be seeing pictures of that fiasco. Last year, only one person showed up so it wasn't thaaaat EPIC.... but hey! This year I actually have some friends so woohooo! Although being the new person in town is not optimal, it gave me the opportunity to hone my friend-making skills. There's a bright side to everything, right?


Thanks for stopping by! Follow my blog and leave me a comment, and I'll be sure to return the favor!
Also - if you haven't yet. Check out my Featured Friday post to ooogle over the amazing Shari Trumbull!


Friday, November 21, 2014

Featured Friday - Shari Trumbull!!!

Welcome to another episode of Featured Friday! 

Before we move on to introduce the talented designer, the winner of last week's blog candy giveaway is KT Fit Kitty! Please email me at bexcruger (at) gmail (dot) com to claim your prize!!

Now - on to the good stuff. This week's featured artist is....


Shari Trumbull!!!


Shari owns the blog Ain't That Artsy Fartsy. The things this lady can do with texture and layers constantly have me questioning why I even bother to pick up a pair of scissors. Since comparison is the thief of joy I've decided instead not to compare, but rather to copy! Woot! This week I'm taking on some of Shari's favorite crafting techniques. 

A resident of Idaho, Shari has mastered her way around texture-creating design elements like texture paste and she introduced me to Distress Crackle Paste (thank you!!!).  I can't wait to show you her designs!

But first, here's seven things you should know about Shari, in her very own words:

1. How did you enter the crafting/stamping world?

I was a late bloomer to the world of crafting and didn’t do anything ‘really’ creative until I was in my late 20’s when I was invited to a Stampin’ Up party-around 1997-and that’s all she wrote. I did end up taking a 4 year hiatus from crafting, but when I came back to card making in 2010, so much had changed--it was like a brand new industry!! 


2. If you could be one craft supply, what would it be and why?

A black ink pad. The single most useful supply you can own and start out with, simply because you can use every stamp with it (I know I do!). This is the also color of ink pad that I reach for when testing out new stamp images so I can see details, and this is the color of ink pad that I stamp almost every sentiment or quote with. 

3. What types of design aesthetics are your personal favorites?

I like so many!! I started out as a more clean & simple kind of card maker, but since re-emerging into the creative world in 2010, my fav design aesthetic has become the vintage-grungey style (a la Tim Holtz) with lots of color and layers and fun things to look at and touch! But, I’ll still whip out a CAS card once in a while.

4. Is there anything you wish you could do that you've seen other crafters achieve?

Effortless creating!! I’m in awe of the designers who can make several projects at once, day after day, week after week and keep going year after year!! Talk about inspiring!! I Want That!! 

5. What are your favorite card challenge blogs?

Oh, I have a few--Tim Holtz 12 Tags of 2014, Our Creative Corner, Compendium of Curiosities 3, A Vintage Journey, Eclectic Ellapu, Frilly & Funkie and then there are the challenge blogs sponsored by stamp manufacturers like Artistic Outpost, Stampotique, Lost Coast Designs, Darkroom Door. I may not participate in every single one, but the inspiration the challenges offer, is priceless! 

6. When you get stuck or lose your mojo, how do you get it back?

This is a good question, because I happen to be in a creative slump at the moment (especially with trying to get into the Christmas creative mode!). I’m ‘working’ myself out of this loss of mojo by taking a step back (from the worktable) and doing something else (not creative) for a little bit--but I can only clean the house so much!! When that doesn’t work, I visit my favorite blogs and see what my crafty friends have been up to--I’m sure to see something that alights a creative spark in me.


7. What's the best advice you have for new crafters? 

The best advice I could give to new stampers would be GO FOR IT and HAVE FUN!!

---------------------------------------------------------------------------------

I knew we were going to be great friends when I saw that she rivaled my personal best for usage of exclamation points! I was so excited that she'd agreed to be featured.

The Original


Like I said - this girl has such an amazing way with texture and layering, don't you agree? I love, love, love the vintage images on here and the chipboard arrows that just create such a great design flow.

My CASE Card

Instead of going with a tag, I kept the feel of one by creating a tall and skinny card. I created a background with circles to mimic Shari's design by sponging Festive Berries and Forest Moss Distress Inks through a stencil. I also wanted to incorporate lots of texture, so I added some Distress Crackle Paint in certain areas and then sponged over that with Vintage Photo DI. 

I kept the vintage feel by using a free digi image I found on Free Vintage Digital Stamps. This girl just looked so snarky that I had to give her a snarky sentiment to go along with her. I also cut out a jaunty hat, and layered, layered, layered ala Ms. Trumbull!

Shari's CASE Card


 Gosh I love this card!! She also kept the circle background and used many of the same colors and "messed" it up a bit by doing splatters all over! Loving the look. To see how Shari achieved her look, please visit HER BLOG - Ain't That Artsy Fartsy. 

Seriously. Please make sure you go and give this talented lady some extra bloggy love today. I'm sure it will bring a huge smile to her face. 

Due to the holiday next week, Featured Friday will be missing, so I'm not running a blog candy this time around (but check on the next time!)

I'm sending my card over to:
Thank you for stopping by! Follow my blog and leave me a comment below and I'll be sure to return the favor!

Wednesday, November 19, 2014

Stylin' Psychedelic Card

For people who like to play with mixed media cards, there always seems to be little bits of textured something laying all over random surfaces in the craft room. Mostly because we have to let certain types of product dry and then we forget all about it. 


This happened to be one of those pieces. I made it when I first got my bottle of gesso in, and I wanted to try using it to create different cards. This pieced was made by sloshing some gesso through a tulle net. The little round circles are air bubbles which are either popped or unpopped and have created this rad texture!

So the question became: what to do, what to do? (I guess that's probably two questions...) I found this AMAZING color scheme challenge going on at JUGs using turquoise, red, and yellow. 


I used Broken China, Festive Berries, and Spiced Marmalade Distress Inks to swirl a background, and highlighted the textured bits using Festive Berries. 


I pretty much could have stopped there and hung it on my wall, or danced around with it a little bit because the paper just screamed BECCA! I MAKE YOU HAPPY!

But the deal is, I got a new stamp set, which means I had to incorporate that right?! I ordered the CityGirl stamp set from STAMPlorations. When I first saw the set, I didn't know if I would use it. Then I saw all these fabulous creations being made with it and decided I was stupid and I needed to order it like RIGHT now. This type of thing happens frequently with me. I LOVE this set. Seriously, I'm envisioning a million-and-one ways to color this girl. 


As you can see, I colored her to coordinate with my card. and I added some brads. I forgot how great brads can be to finish out a project and make it look so "finished". Thankfully Sentimental Sundays challenge reminded me this week. 

Speaking of things that I sometimes forget are really great, as I was making this card, I suddenly decided that it needed to go to one of my very good friends who I talk to almost every day. Sometimes I forget to thank the very people who I'm MOST thankful for because they are always smack-dab right in front of my face. So this card is going to be my attempt at reminding her how great she really is. 


In addition to JUGS, this card is going over to the following challenges:

Thanks for stopping by! Follow my blog and leave a comment and I will certainly try to do the same for you!

Tuesday, November 18, 2014

Hard and Soft

It is snowing gobs and gobs here in North Dakota! I am not yet wishing for spring because I'm still reveling in the soft, fluffy flakes but apparently my craft brain is.

My wonderful and amazing Aunt Jerrie from Coloring Outside the Linez sent me a package which included a new Spellbinders stencil and a couple of die cut butterflies with the following note "Ready. Set. Create!"

I can't resist a good dare. ;)

I saw this image over at Runway Inspired Sketches:


and it just reminded me so much of a butterfly with all the intricate lines. I love the great Herve Leger, who is most well known for his bandage dresses and jaw-dropping optical illusion creating dresses. So I am incorporating both a butterfly and the colors from this photo into my design. 

I also wanted to play along with Verve Stamps Diva Dare this month - which is "Vellum Visions". I did a play on hard and soft, using embossing paste for the "hard" and vellum for the "soft". 

I began by swirling shades of pink and orange Distress Inks onto a piece of white cardstock. 


Then I used the awesome Spellbinders stencil my aunt mailed to me and used Wendy Vecchi's Crackled Embossing Paste:


Next, I put clear embossing powder over the paste, and dried it with a heat tool, letting it crack and pop. 

I used the Wishing You set from Verve to create my sentiment and layered polka-dotted vellum over the butterfly and plain vellum behind my sentiment to create a delicate softness. I also added sequins from Verve's Shine Bright sequin mix


Somehow, I managed to forget to take a picture of the inside. I made this card for my friend, Jessi Fogan in honor of her birthday - so if you see it before you get it in the mail, Jessi, act surprised! :) The inside says "A Very Happy Birthday".

I also made another one to send to my aunt as a thank you, of course. Hers says "The Best Day Ever!" on the inside. :) 

Thanks for stopping by! Follow my blog and leave me a comment, and I'll be sure to return the favor. As for now, since it's so snowy outside I'm off to cuddle on the couch and eat some popcorn. Ahhhh! This is the life. 

Sunday, November 16, 2014

A-Muse-ing Christmas

I found this really cool challenge blog called Muse, which gives one card per week to inspire other designs. The unique part is that at the end of the week your fellow designers get to vote on who takes the top honors. I really wanted to participate and was excited to see the next Muse inspiration card. 


Then I saw this:


Gulp - Don't get me wrong, I think Therese's card is absolutely brilliant. It's full of sparkly goodness and whimsical Christmas cheer. The problem is - it's so clean and I am so TERRIBLE at clean. That's right. I said it. I'm a dirty kind of girl. ;) 

I was going to just skip this week and participate next week but then I checked myself before I wrecked myself. Why wouldn't I take on something that was challenging for me? So I set out to do clean - Becca style.


Since I couldn't really distress, it meant adding lots of texture. I started by cutting the foundation of my "tree" out of some thin cork ribbon:


Next, I looked around for something to add texture. As I was wandering the clearance aisles of Hobby Lobby this week and drooling, I found these really cool things made by Stampendous called Frantage color fragments. They are almost like the texture of little paint chips. I put glue all over the cork, and added the chips, giving it a little ombre down at the bottom.

  
I glued that to some white cardstock, added some colorful embellishments, and stamped my sentiment and voila! 

I'm not about to make this my new design aesthetic, and am so JEALOUS of those talented designers who can pull it off with ease. It looks easy, but to make something seem that effortless is HARD! I have to say, though, I'm loving the texture of this rad tree.

So I'm sending it over to the Muse Challenge and to Just Add Ink's - Just Add Texture challenge. 

Thanks for stopping by! Follow my blog and leave me a comment and I'll be sure to return the favor!


Friday, November 14, 2014

Featured Friday!!! Dawn Turley~

Happy Friday! I hope you've all had a better week than I did. The plague struck and I've been swallowing shards of glass for the last two days. Eeek!

I'm sorry I didn't post the winner of my first giveaway yesterday, but see the above reason. I plum forgot! After a little drawing and a tabletop drum roll...the winner is.... Donna of Yellow Dog Greetings. Donna, please email me at bexcruger @ gmail dot com with your address. \

And now that business is all done, time for the party! This week's featured designer is:


Dawn Turley of Dawn's World. I "met" Dawn through the Card Chain Challenge, a monthly international card exchage. A resident of New Zealand, Dawn is a whiz with Distress Inks and markers (can you see why I like her yet?). Her designs ooze with bold color and clean lines. But why tell you about her when she can do so much better herself?

Here's seven things to know about Dawn:


1. How did you start stamping?

I started stamping in 2008 when another lady and I reached for a stamping magazine at the same time... she asked me if I stamped and when I said no I just liked looking at the magazines... she invited me to come along to a stamp group at a local stamp store that was on the next day... so I went and as they say.... the rest is history. I was hooked in a BIG way. 

2. What types of things inspire you?

This is hard... all sorts of things inspire me. Some times colours or sketches inspire me and I love visiting other blogs to get inspirations. And who can resist Pinterest! So much there to inspire there.


3. What would you say is your stamping aesthetic?

I'm a CAS stamper. Much as I love looking at vintage and Shabby Chic, I struggle with this genre. I like a few embellishments but like a clean style the most.


4. If you were stranded on a deserted island, what one crafting supply would you have to bring?

Only one? Minimum - stamps,inks, Copics, heck just let me take everything and I'll be happy stranded on that island for a very long time! No one to interrupt me!


5. Favorite card making challenges to participate in?

I'm on a few challenge blogs - Die Cut Divas, Southern Girls Challenge Creative Craft Cottage but a few of the other's I like to enter are:

City Crafter challenge

Crafting when you can

Penny Black and More Challenge


There're so many fun challenges out there and I often have a bit of fun entering into others.


6. Fill in the blank: The one thing new stampers should know is __________.

Just have Fun and try out lots of techniques. Don't over-analyse what you are doing.


7. What's your best organization tip for crafting supplies?

Organising your craft supplies? What's that? I'm such a messy crafter I have stuff all over the place. I try to keep things organised but I get distracted creating and forget to put things away.

------------------------------------------------------------------------------

I'd have to agree with her on number 7! My craft room is about as messy as my designs! I was so excited when Dawn agreed to be featured and she chose this card for me to case:

The Original


Look at all those beautiful messy splatters! Like I said, she's a master of bold colors and this card is no exception. I loved the way it looks like she's double stamped the image in multiple colors before blending. And the way it's all set a little off kilter? Fab-o!

My CASE Card
I saved the off-kilter design and went for slightly larger splatters in shades of pinky-purples. I used STAMPlorations Bloom Sketches set to stamp that gorgeous daisy and colored it in bold, rich shades. I backed the image using a chocolate paper with shimmery strips of raspberry. I finished it off with some enamel dots from Doodlebug Designs. Dawn's design sure was an inspiration!

Dawn's CASE Card


Dawn used her design to create this gorgeous Christmas card! Look at all those beautiful splatters! They look like twinkling lights and give this card such a festive feel! I love the scale of her sentiment. To learn more about how she created this card, see Dawn's blog

BLOG CANDY ALERT!!


That's right! I'm having another little giveaway. Mostly just to say thank you to all of you who've left me kind comments and given me encouragement along the way. If you'd like to be in the running for the prize, here's how:
Leave me a comment below - 1 entry
Leave Dawn a comment on her blog - 1 entry


Thanks for stopping by!
I'm sending my CASE card over to these challenges:
Thanks for stopping by! Make sure to follow my blog to see if you've won! The winner will be announced next week. 

Wednesday, November 12, 2014

Thanksgiving Centerpiece with Gesso and Perfect Pearls

My coworkers all laugh at me, because I'm always picking up bits and pieces of things they are going to throw away. This was an apple cider jar one of my coworkers brought to a recent fall-themed potluck. As she was about to chuck it into the garbage, I stopped her and asked if I could have it. She looked at me confusedly, but handed over the jar! Woot! Normally this blog is all card making, all the time, but I had to share my finished Thanksgiving centerpiece. 


The first thing I do when starting a project is to look for inspiration from challenges. The fabulous Oscar de la Renta is being paid tribute over at Runway Inspired Sketches. He will be much missed and left an indelible mark on the fashion industry. I loved his ability to create such light, airy, girly clothes that flattered every figure. I'm not really sure if it's a card making only challenge because the rules don't really say, but I'm going to find out. ;) I chose this image to inspire my design:


 It's bold and graphic and shimmery, but isn't too hoity toity (notice the sneakers?) That's the look I was going for with my creation.

In my last post, I wrote about my first experience using gesso on cards. Did you know you can also use it to paint on glass? I began by slathering my jar in gesso.  It took three different coats! Here you can see the progression. 


I've also written many times about my love for Perfect Pearls because those babies are so versatile! (If you want to see many of the ways they can be put in action - check out my post A Walk Down Memory Lane.) I wanted to make the leaf motif on the jar really stand out, so I mixed some Perfect Copper with water to form a pasty paint. 


My camera was cooperating quite well and you can see the shimmery copper accents. I painted the leaves and the stem of the jar and then added Perfect Gold, which is a slightly lighter shade to accent the veining on the leaves. 


I let everything dry, and voila!!


It looked lonely there all by itself, so I ran to Hobby Lobby and grabbed some burlap flowers, berry sprigs, and a little glittery cardinal to add some cheer. 


I hope my dinner guests will like it as much as I do! The next time you think about throwing out a cool glass jar, why not upcycle it into something truly lovely? 

I'm also going to enter it into the following challenges:
Eclectic Ellapu - Leaves 
Mixed Media Mojo - Thankful (because it's for Thanksgiving dinner)

Thanks for stopping by! Follow my blog and leave me a comment and I'll be sure to do the same for you!

Tuesday, November 11, 2014

With Solemn Remembrance and Respect


In Flanders Fields

Lt. Col. John McCrae
In Flanders fields the poppies blow
Between the crosses, row on row
That mark our place; and in the sky
The larks, still bravely singing, fly
Scarce heard amid the guns below.


We are the dead. Short days ago
We lived, felt dawn, saw sunset glow,
Loved and were loved, and now we lie
In Flanders fields.


Take up our quarrel with the foe:
To you from failing hands we throw
The torch; be yours to hold it high.
If ye break faith with us who die
We shall not sleep, though poppies grow
In Flanders fields.

The many, many men and women who have served or are serving our country deserve so much more than the simple thanks I have to offer today. Your courage, bravery, and honor are deeply respected.

In my family, there are many veterans and I'd like to take the time to thank them each.

Paul Dennis Mead, cousin


 Ryan Wiberg, cousin


Dakota Krout, cousin


Bradley Koehn, cousin


Jacob Wolf, almost-little-brother


Not pictured: My grandpa, Paul Mead - gone but not forgotten

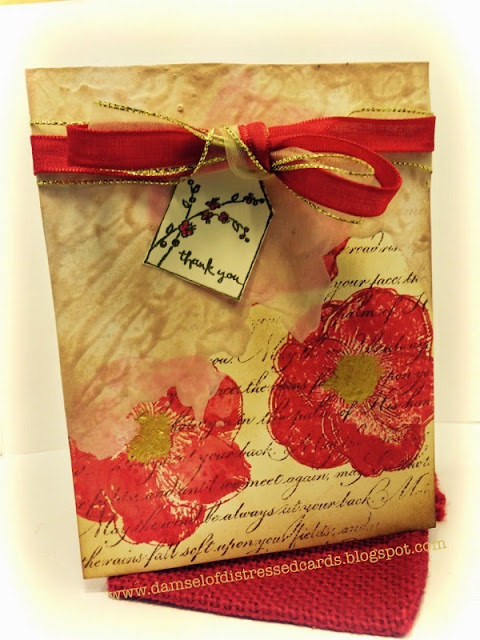
Today is Veteran's Day here in the U.S. and a day of solemn remembrance and appreciation. The card I made today uses poppies and is a thank you card, in honor of the men and women who have served our country.

I got in a new product to try. I love embossing paste so much (if you want to see some tutorials - check it out on the blog post Playing Around With Embossing Paste) that I decided to try my hand at using gesso. 

Gesso is similar to embossing paste, in that it's used to create mixed media projects and texture. Most commonly, gesso is used to prep canvases for acrylic or oil paintings so that the canvas doesn't soak up all the paint. 

To use gesso, I started by mixing some of it with some Vintage Photo Distress Ink, because I didn't want it to be so stark white. 


I stamped a background stamp in Vintage Photo, and then stamped over that with a poppy image from a very old Martha Stewart stamp set using Festive Berries and Fired Brick DIs. Then I applied gesso over a portion of the card.

I let the paper dry on a flat surface and then brushed over it with more Vintage Photo. The gesso that was applied over the stamped poppy absorbed some of the Distress Ink, because DIs are reactive to liquid. I think it created such a neat effect. 


Lastly, I added some Perfect Pearls (perfect gold) to the center of the poppies to give it a little shine, and tied the whole thing together with a thankful tag and some coordinating ribbon. 


I also stamped a sentiment on the inside:


If I were comparing embossing paste to gesso, here's how they'd rack up:
  • I like the texture of embossing paste better. It's almost like shaving cream, while gesso has the texture of runny glue. 
  • Gesso is more see-through than embossing paste. Which can be cool if you want an image to shine through.
  • Gesso dries faster, and creates a harder surface
  • Embossing paste has more dimension. Since it's not quite as runny, it can create more height
  • Embossing paste is far easier to clean! Gesso gets everywhere and is not as easy to scrape off a mat and back into a jar. 
So that's my brief analysis. I'll have to play around more with gesso because I love, love, LOVE how this card turned out.

I'm sending it over to the following challenges:
(As a side note, I want to say thank you to Sweet Stampin' and Allsorts for calling attention to such important people)
Sweet Stampin' Challenge - Poppies or Red for Remembrance
Mixed Media Mojo - November challenge - Thankful

Thank you for stopping by. Don't forget to thank a veteran today! Follow my blog and leave me a comment and I'll be sure to return the favor!

P.S. - I have a little giveaway going. If you'd like to enter, go to my Featured Friday blog post.