P.S. (yes I know that means POST script, but I'm a rebel) I would warn you that this is a picture heavy posting, but A) I don't believe in warning people - it's better that they find out what they've gotten themselves into after they're too far sucked in (that's how I've gotten all my boyfriends) and B) Who doesn't like pictures?
Anywho, I've used my new crafty products once or twice, but mostly they've been woefully staring at me from their mesh bag home. In an effort to remind myself to use them more, I've given them a new, shiny home and plopped them right on my crafting table.
That storage holder thing-a-ma-bob is actually a spice rack that I purchased at a garage sale for a paltry $5. Woot! So now you know, A spice rack holds spray stains perfectly and Distress Paints perfectly!
Now back to the card. I'm guest designing over at Cardz 4 Guyz this month and the theme this week is transportation. I have these old trucks from the Tim Holtz "Enjoy the Journey" set and thought I'd create a background to compliment them.
Step One:
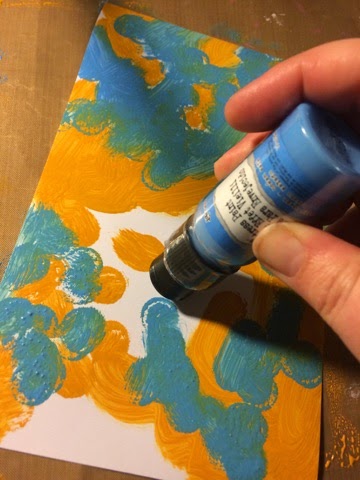
Dab a bunch of Salty Ocean and Wild Honey Distress Paints
on a piece of cardstock:
Step Two:
Make sure layer one is completely dry (you can speed this along with a heat gun) and then apply Tarnished Bronze Distress Paint over the top. Use an flat object to scrape the paint in a thin layer (I used the edge of an acrylic block, but you could use a spatula or a credit card, or even a thick piece of cardstock).
You can scrape the paint side to side in areas and up and down in other areas for added visual interest. You can also add dabbed areas on top (see right picture) for more texture. It's ok if bits of the first layer show through!
PAUSE!
At this point your background will look a lil' something like this. You can just stop here and you'll have that aged metal effect. But I wanted a little more texture, so I added a couple more steps.
Step 3:
(optional)
Add an embossing powder for more texture
While the paint was still wet, I selectively added an embossing powder called Rusted Metal (it's really old, so I can't tell you where I got it) and then heat dried.
Step 4:
Spray it all over with Black Soot Distress Spray Stain
Let it sit for a second or two, and then dab up excess with a paper towel. And then you will have....
An amazingly textural background that looks like oxidized metal!
Now the real question was what to do with it. I opted to use an NBUS Embossing Folder that my Design Team Coordinator, Samantha Aguilera sent to me. (Big thanks!)
I stamped an old truck using a three part process. First in Wild Honey Distress Inks, then in Evergreen Bough, then in embossing with the same Rusted Metal powder. I also used some chipboard and added embossing powder and Salty Ocean Distress Paint to the edges to achieve that oxidized effect again.
For not being a guy cardmaker, I really loved the way this turned out and want to super thank Cardz 4 Guyz for reminding me that boy cards can be tons of fun, too!
I'm also going to link my card up to the following challenges:
Mixed Media World - Anything Goes
Craft Stamper Magazine - Use a Stamp
Retro Sketches - Thanks for the great sketch!
Whew! Well you got through all the pictures. Thank you for coming over and for sticking with me! And you should totally check out Cardz 4 Guyz, too!!!


.jpg)


.jpg)