
P.S. (yes I know that means POST script, but I'm a rebel) I would warn you that this is a picture heavy posting, but A) I don't believe in warning people - it's better that they find out what they've gotten themselves into after they're too far sucked in (that's how I've gotten all my boyfriends) and B) Who doesn't like pictures?

Anywho, I've used my new crafty products once or twice, but mostly they've been woefully staring at me from their mesh bag home. In an effort to remind myself to use them more, I've given them a new, shiny home and plopped them right on my crafting table.

That storage holder thing-a-ma-bob is actually a spice rack that I purchased at a garage sale for a paltry $5. Woot! So now you know, A spice rack holds spray stains perfectly and Distress Paints perfectly!
Now back to the card. I'm guest designing over at Cardz 4 Guyz this month and the theme this week is transportation. I have these old trucks from the Tim Holtz "Enjoy the Journey" set and thought I'd create a background to compliment them.
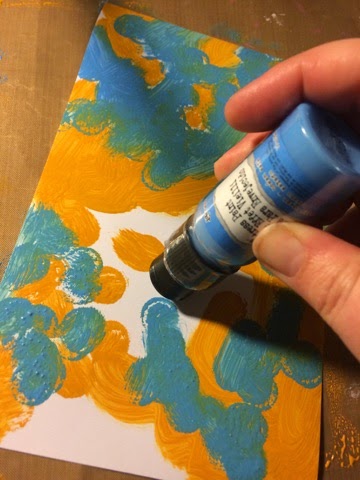
Step One:
Dab a bunch of Salty Ocean and Wild Honey Distress Paints
on a piece of cardstock:
Step Two:
Make sure layer one is completely dry (you can speed this along with a heat gun) and then apply Tarnished Bronze Distress Paint over the top. Use an flat object to scrape the paint in a thin layer (I used the edge of an acrylic block, but you could use a spatula or a credit card, or even a thick piece of cardstock).


You can scrape the paint side to side in areas and up and down in other areas for added visual interest. You can also add dabbed areas on top (see right picture) for more texture. It's ok if bits of the first layer show through!
PAUSE!

At this point your background will look a lil' something like this. You can just stop here and you'll have that aged metal effect. But I wanted a little more texture, so I added a couple more steps.
Step 3:
(optional)
Add an embossing powder for more texture

While the paint was still wet, I selectively added an embossing powder called Rusted Metal (it's really old, so I can't tell you where I got it) and then heat dried.
Step 4:
Spray it all over with Black Soot Distress Spray Stain

Let it sit for a second or two, and then dab up excess with a paper towel. And then you will have....

An amazingly textural background that looks like oxidized metal!
Now the real question was what to do with it. I opted to use an NBUS Embossing Folder that my Design Team Coordinator, Samantha Aguilera sent to me. (Big thanks!)

I stamped an old truck using a three part process. First in Wild Honey Distress Inks, then in Evergreen Bough, then in embossing with the same Rusted Metal powder. I also used some chipboard and added embossing powder and Salty Ocean Distress Paint to the edges to achieve that oxidized effect again.

For not being a guy cardmaker, I really loved the way this turned out and want to super thank Cardz 4 Guyz for reminding me that boy cards can be tons of fun, too!

I'm also going to link my card up to the following challenges:
Mixed Media World - Anything Goes
Craft Stamper Magazine - Use a Stamp
Retro Sketches - Thanks for the great sketch!

Whew! Well you got through all the pictures. Thank you for coming over and for sticking with me! And you should totally check out Cardz 4 Guyz, too!!!
Great tute and a fab card Becca, might have to have a go with this! x
ReplyDeleteLooks brilliant too - thanks for sharing and, well done on your recent haul of distress paints and stains too!
ReplyDeleteKathyk
Wow, this is fabulous,Becca! Love all the textures and colours going on here! Wonderful metallic look! And thanks for the tip about spice racks - will keep an eye out for one at the thrift stores!
ReplyDeleteLove the faux metal! The embossing folder really shines in the background. Thursday we are using distressed paints for some projects...really excited as this is the first time the bottles will be opened!!
ReplyDeletesuch a great guy card Becca - fantastic background and love the gold with it!!
ReplyDeleteOMG..It looks like old rusty metal ,Amazing !! Wow..you have been on shopping spree got nice deals ,Lucky girl ! Loved the storage rack too :)
ReplyDeleteLove that you shared step by step photos! Your end result is a fabulous masculine card that someone will cherish! Woot is right! Now I totally want to hit some yard sales and thrift stores! Thanks for sharing :-)
ReplyDeleteFAB, Becca!! Way to go with experimenting!! Love this faux metal that you've created :) OH--Love your use of an old spice rack, too! :) How clever is that!! :) I have all of my spray bottles/stain bottles all lined up--when I reach for one, about 5 fall over!! I need an old spice rack now!! :) :) Happy Tuesday GirlFriend!! XOXO-Shari
ReplyDeleteGreat tutorial! Thanks so much for the step by step photos! I'm going to follow your blog to get some more great ideas and see what your making.
ReplyDeleteI've just pulled out chipped Sapphire, spun sugar to play with and brushed pewter stain. I'll post later today what I create over at http://wanderfulcreations.blogspot.ca/ if you want to take a peek.
Thanks for the follow! I'll definitely be returning the favor. Can't wait to see what you create!
DeleteAbsolutely gorgeous!! The techniques you used are fabulous and the results are awesome!! Love this!! I so need to make more guy cards...you've made me remember that they can be fun, too!! Beautiful card and tutorial, too!! Have a great day :)
ReplyDeleteLisa
A Mermaid's Crafts
This is simply fantastic. Wonderful background, Wonderful embossing. Wonderful focal point. Wonderful card. (I'm beginning to sound loike Lawrence Welk. Never mind, you're to young to understand that reference.) Let's just say, AWESOME card.
ReplyDeletePsssshhhhh - what are you talking about? I had very strict parents - of course I know who Lawrence Welk is. ;)
Deleteoh wow that spice rack is the coolest!!!! love it for storage and what a great card and all those background details!!! amazing!!!
ReplyDeleteWOW! Such an amazing technique and thank you for such a fabulous tutorial.
ReplyDeleteYour card is fantastic. The colours and textures are wonderful.
Sue xx
Love, love, love this Becca...what a fabulous background, perfect for a male card. Definitely going to give this a try! Carol x
ReplyDeleteGreat tutorial for a brilliant card. Keep the pictures coming!
ReplyDeleteElaine
Great card, loving that background technique (and score on all your lovely TH paints and stains, well done!).
ReplyDeleteFabulous! Thanks for sharing how you made this, Becca! You are SO creative.
ReplyDeleteOooh as soon as i stop coughing up a lung i want to try this for myself. This looks so great-I love that background and you gave a great tutorial:)
ReplyDeleteOh what a fab card ! I was fascinated by the background when I saw your card on cardz4guyz and had to come and see if you gave details, didn't expect to find a tutorial ! I'm amazed at how you stamped the car, I really need to try that
ReplyDeleteJoan
Fabulous card, Becca...and even for fabulous is the tutorial. LOVE LOVE LOVE it. SO many great tips, all so clear and yes, who doesn't love pictures, eh?! One more thing - it would be a crime not to grab those inky bargains. :) Thanks for sharing.
ReplyDeletehugs, Asha
Great masculine card. Really like how you did that background! Looks like fun. I like to experiment...but my experiments (or I guess I should say play time) don't usually turn out as good as yours look. Thanks for showing the step by step tutorial...There may be hope for me too...smile.
ReplyDeleteI find male cards a bit harder to do, so thanks for the step by steps, enjoyed viewing the process! And your finished card looks great!
ReplyDeleteShazam!!! What a stunning background Becca!! And the clocks were THE perfect choice. Nicely done!
ReplyDeleteOMG what an aweful lot of awesome goodness you have created in this masterpiece. Loved to have seen the 'mess' you got yourself into LOL. A great piece of ART here. Great tutorial too thanks. Been out of town so now just trying to catch up. Thanks for the great comment on my blog. Hugs.
ReplyDeleteStunning tutorial It's amazing background.
ReplyDeleteI may have snorted coffee at that 'how I got all my boyfriends' comment, lol!! That's how I got mine too :P This is really awesome - I just got some stains and somehow do not have the paints. Hmm. I may have to play to see what I can come up with without shopping :)
ReplyDeleteThanks for the step by step... LOOOVE the aged look you've got! And the multi embossed truck.. Fabulous!!! And your rack. What a BARGAIN!!!!
ReplyDeleteThis is amazing Becca - I love how this came out! Your technique is creates some really stunning colours and the spice rack, genius!! I may to do that myself when I get fed up with how they're stored at the moment xx
ReplyDeleteSO awesome! Fabulous colors, fabulous texture, fabulous tutorial! THANK YOU for sharing this!!! HUGS! :) Mynn xx
ReplyDeleteThis is just a fantastic technique Becca, LOVE IT!! Fabulous card, that image is so perfect for the rusted metallic background! Thanks for the inspiration! hugs :)
ReplyDeleteFabulous, and thanks for the tutorial Becca. Great manly card.
ReplyDeleteWhat a great tute Becca and your finished result is awesome!
ReplyDeleteThis is fabulous! Great tutorial too. Thank you for joining in with the Craft Stamper TIMI challenge ... good luck! Linda XX
ReplyDeleteYou make messy look clean...gorgeous faux metal background and the embossing just made it totally over the top awesome. Nope....I didn't mind getting sucked in at all ;-P
ReplyDeleteThank you for all the photos!! I am going to have to try this-but will have to get the black soot spray. Don't have that one. The background looks AWESOME!!!
ReplyDeleteIncredible technique and fabulous results :) love this, got to give it a try !
ReplyDeleteSTUNNING
ReplyDeleteStunning FAUX METAL BG
You amaze me also with making manly card Becca
you really a talented lady all ART you can do best
and that First creation with that lady FACE WOOOOW WOOOOW WOOOOWW
I am speechless
cant speak
its breathable you take my breath Becca
STUNNING POST..
I love your creativity..
hugs and see you soon on my blog post :)
Monika
Oh, heavens, I have to admit there for a minute I had my doubts! But, holy guacmymole, Becca, you ended up with a totally metallic sheet! NO ONE would ever think that was originally a piece of paper!! I love your truck, too, and it is greatest guy card ever, but I sort of hated for you to cover up that incredible timepiece textured work of art! I prolly asked you this before, but do you do the Tim Holtz challenges? Compendium of Curiousities or something like that? I have so many British friends who do this sort of AWEmazing creations and, man, you would fit right in and excel at all those challenges! (And, as an aside, I am loving that spice rack idea; you are a girl after my own heart, but then I always say that to you!) Thank you so much for your kind words and for playing in my NBUS Challenge #4!! Hugs and Mwah! Darnell
ReplyDeleteI LOVE Tim's style, but I have a hard time playing in his challenges because I don't have a lot of Holtz-specific stamps (besides this set). So I haven't really played along with his or the challenges over at A Vintage Journey, but I do oooo and ahhhh over the creations featured there.
DeleteWowzers - what a result! Quite amazing! Also love the spice rack idea!
ReplyDeleteThis turned out really cool!! Love your results with this and your design is FABULOUS!!! :)
ReplyDeleteLove this, great techniques x
ReplyDeleteOhhhh snap! Totally nailed this technique!! I so want to try this now Becca!!! Thanks so much for sharing a)about your boys :) B) the technique you used and C) the amazing way you store these-spuce rack here I come! Hugz! ~Niki
ReplyDeleteAll the 'good' comments have been written by those marvelous people who are on time with leaving you notes! So, I'll just say this: I LOVE YOUR CARD! The tutorial had me a little concerned, but as I watched the magic unfold...WOW! Stunning! Yet again, in awe over your impressive, unlimited creativity! The spice rack...hmmm! If only I could score all those paints at the price you did, I'd invest...one of these days, the 'perfect' coupon and the 'right store' will coincide...
ReplyDeleteHugs~c
Becca - you have floored me with the awesomeness that is this card - that background though, it is amazingly cool and WOW!! Love the way this card turned out - so cool and perfect for a man card!!! Well done - you are delightful and awesome - loved all the pictures!! Way to go!!!
ReplyDeleteFantastic Tutorial and great Masculine Card! Have you considered writing a tutorial and having it published in the next TTCRD magazine? We always love new and inspiring ideas. Thank you for sharing your work with TTCRD this week and please come and join us again tomorrow with our new Anything goes Challenge. Visit me at http://ialwayslovetomakecards.blogspot.com
ReplyDeleteLove the effect and the look of this technique! So cool!
ReplyDeleteAMAZING background, overall perfect guy card. Thank you for sharing the step by steps.
ReplyDeleteOh this is so stunning, what a beautiful background.
ReplyDelete